How to Color Correct Video Without Breaking a Sweat: A Beginner’s Guide!
Video color correction is the secret sauce that transforms dull clips into vibrant, visually stunning masterpieces. This method is very useful for creating social media content, a short film, or a professional project to ensure your visuals captivate your audience. In this blog, we’ll discuss two popular tools, Filmora and HitPaw Online AI Video Enhancer, to show you just how to color correct video with easy step-by-step instructions.
Part 1. What is a Color Correction In Videos?
Color correction is the process of adjusting and balancing a video’s colors to make it look natural, consistent, and appealing at the same time. Think of it as giving your footage a makeover with a polished touch so it resembles how you see the world in real life—or how you want your audience to perceive it.
When shooting a video, factors like lighting conditions, camera settings, and environment can cause colors to look off. For example, while shooting a video indoors under warm lighting, it might appear too yellow on the screen. On the flip side, when you shoot outdoors on cloudy days, the end result might seem washed out.
Color correction fixes these issues by tweaking elements such as brightness, contrast, saturation, and hues to achieve a balanced and realistic look.
This is really important for maintaining consistency across different shots, especially in professional projects. Imagine a movie where one scene looks overly bright and colorful while the next is dim and lifeless—it would feel disconnected.
Modern video editing software, like Filmora, and online tools like HitPaw AI Video Enhancer make color correction accessible to everyone. They offer simple sliders, presets, or even AI-powered enhancements to make the process straightforward.
In short, color correction ensures your video looks more professional than before and true to your creative vision. Whether you’re a beginner or a pro, learning this art will take your content to the pro level.
Part 2. How to Color Correct in Filmora: Step-by-Step Guide
Filmora is a beginner-friendly yet powerful video editing tool packed with features to enhance your videos. Its intuitive interface makes it a go-to choice for creators who want professional-looking results without spending hours learning complicated software. The color correction tools in Filmora offer sliders and presets to help you fine-tune brightness, contrast, hue, saturation, and more. Let’s explore how to get started.
Step 1: Import Your Video
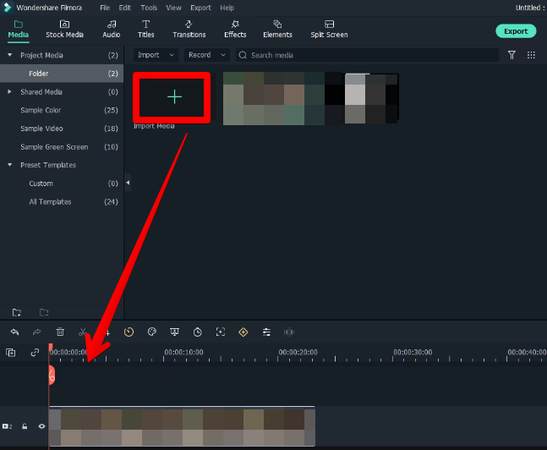
In the first step, download the latest version of Filmora software on your PC and install it. Next, launch the software, click Create New Project, and import your video by clicking Import Media or dragging the file into the timeline. Then, place the video on the editing timeline below.
Step 2: Access the Color Correction Panel
Now, Right-click your video clip on the timeline and select “Color Correction.” Alternatively, click the “Color” icon above the preview window.
Then, use the sliders for Contrast, Saturation, and Brightness to adjust the overall look of your video:
- Brightness: Makes the video lighter or darker.
- Contrast: Adds depth by emphasizing the difference between light and dark areas.
- Saturation: Enhances or mutes colors.
You can also select Hollywood color sets, like Batman, Joker, etc, for your video.
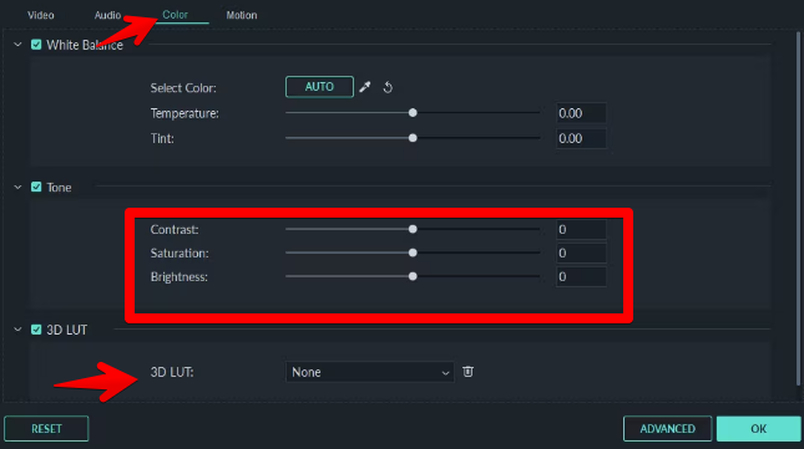
Next, preview your changes in real time to ensure the look matches your vision.
Step 3: Apply Presets for Quick Edits
You can also apply Filmora's built-in color correction presets, like Vintage, Film, Cinematic, Cool Tone, etc.. To do this, click “Advanced Color Tuning” in the top toolbar to access the templates window, and from there, you can either choose a preset ot fine-tune the color in your video with:
- 3D LUT
- Color
- Light
- HSL
- Vignette, ad more
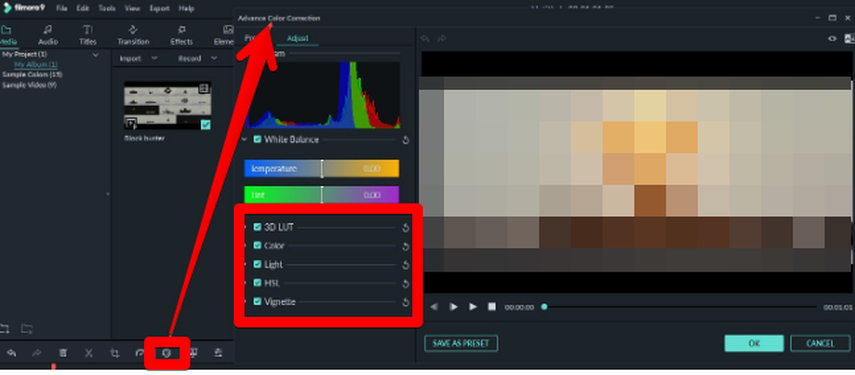
Apply a preset with a single click and customize it further if needed.
Step 4: Save and Export
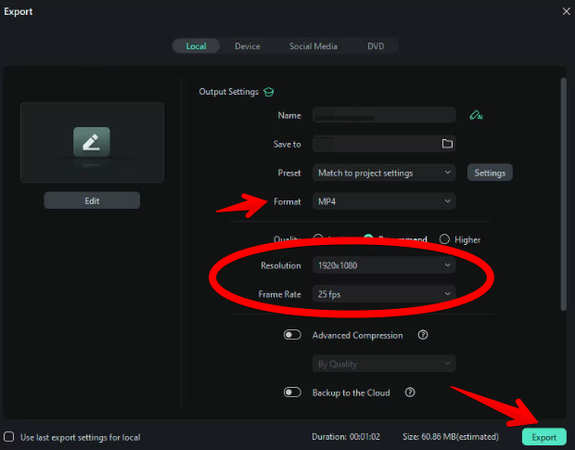
After you’ve finished color-correcting your video, click “Play” to analyze the whole video on the previewing window. If you are totally satisfied with the results, click “Export” and choose your desired format, resolution, and export settings.
Finally, click “Export” again. You can directly save the edited video to your computer.
Filmora makes it easy for creators to achieve a professional look in their videos without breaking a sweat.
Part 3. How to Edit Video Color Using HitPaw Online AI Video Enhancer
For creators on the go, the HitPaw Online AI Video Enhancer is a game-changer. This browser-based tool uses advanced AI models to color-correct videos effortlessly. No software installation is needed, and it’s perfect for those who need quick, high-quality results. The Color Enhancement AI Model in HitPaw intelligently enhances your video’s colors, making them richer and more lifelike.
Here are the steps:
Create Now!Step 1: Open HitPaw Online AI Video Enhancer
First, open any browser on your PC and go to the HitPaw Online AI Video Enhancer website. Sign in or create an account to have more control over editing your video.
Step 2: Upload Your Video
Next, click the “Choose Video” button on the homepage to upload the video from your device or drag and drop the video you want to edit directly on the online platform.
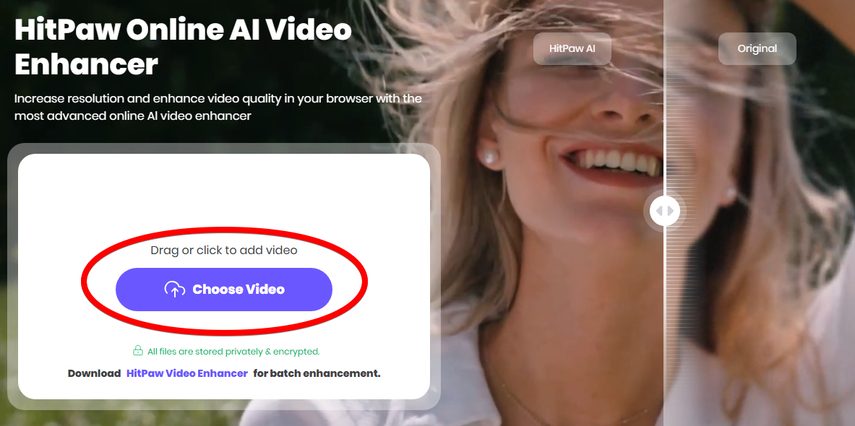
Now, wait for the video to load fully.
Step 3: Select the Color Enhancement AI Model
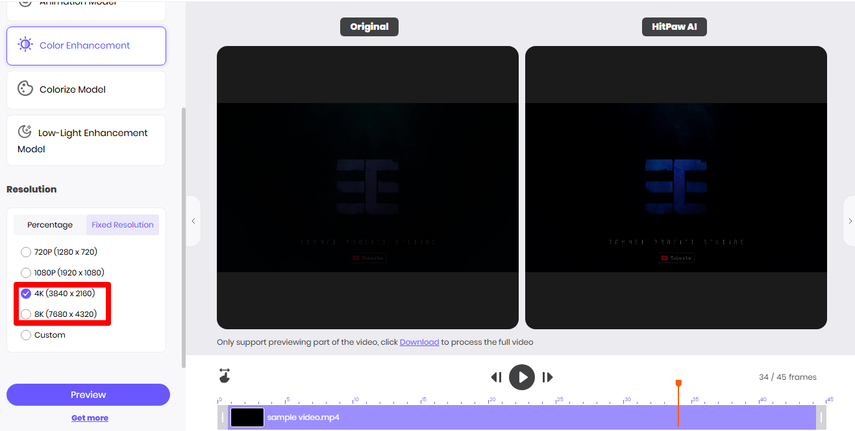
Click the “Color Enhancement” AI Model (in the left menu) from the list of available options. This model is optimized to enhance vibrancy and correct color inconsistencies.
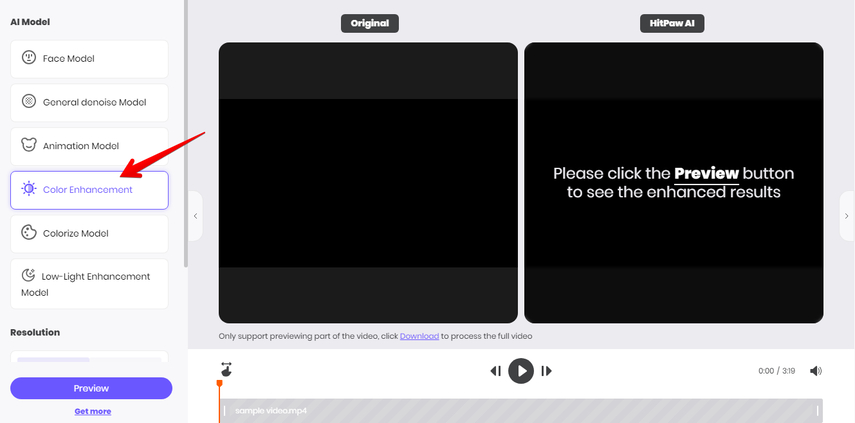
Step 4: Preview Color Correction Enhancements and Download
Click “Preview” and wait for the video to process and to see a side-by-side comparison of the original and enhanced footage.
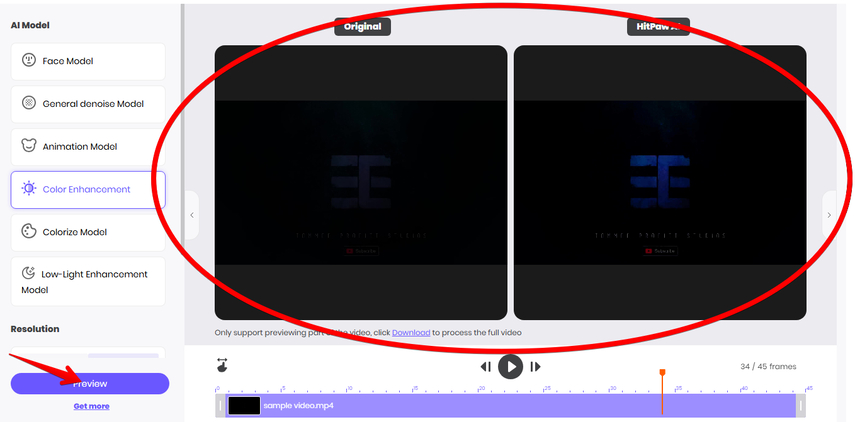
Once you’re A-Okay with the results, click “Download,” type in your email and your desired format, and get the edited video within minutes.
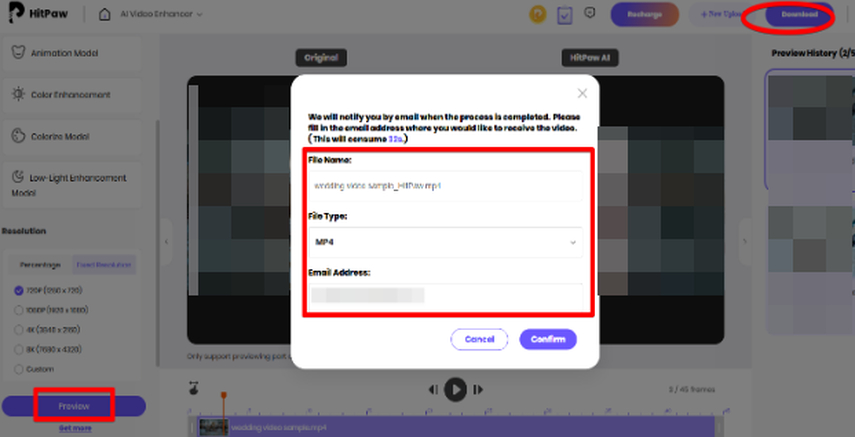
With HitPaw’s AI-powered tools, even beginners can achieve professional-grade color correction in minutes.
After color-correcting your video in HitPaw Online AI Video Enhancer, you can further upscale its resolution to introduce more clarity. To do this, click “Resolution” in the left menu, select “Fixed Resolution,” and choose “4k” or “8K.” Then, click “Preview” again to see the difference.
Part 4. FAQs of Color Correcting Video
Q1. Can you color correct a video?
A1. Absolutely! Color correction is a standard process in video editing. It involves adjusting the brightness, contrast, saturation, and hues of a video to make it visually appealing and consistent. Tools like Filmora and HitPaw Online AI Video Enhancer make it simple, even for beginners. Whether you’re aiming for a natural look or artistic effect, color correction ensures your footage looks polished and professional.
Q2. How do I edit the color in a video?
A2. Editing video color involves using software or online tools to adjust properties like brightness, contrast, and saturation. Programs like Filmora and Adobe Premiere Pro offer in-depth controls, while online options like HitPaw provide AI-assisted enhancements. Start by importing your video, accessing color correction tools, and tweaking settings until you achieve the desired look. Presets and AI models can also simplify the process for beginners.
Q3. How do you color grade cinematic video?
A3. Color grading for cinematic videos involves creating a specific mood or tone, often using advanced editing software such as Filmora DaVinci Resolve or Premiere Pro. The process typically includes balancing colors, enhancing skin tones, and adding artistic effects. Tools like LUTs (Look-Up Tables) and color wheels are commonly used to achieve a cinematic aesthetic. Combining creative adjustments with technical precision ensures a visually stunning result.
Q4. Is color grading videos hard?
A4. It can be really hard at first, especially for newbies, as it requires both technical know-how and a good eye for aesthetics. However, HitPaw Online AI Video Enhancer simplifies the process with one-click AI enhancements. However, with practice and experimentation, anyone can learn to color grade effectively in Filmora or other video editing software.
Q5. Which software is best for color grading video?
A5. The best software depends on your skill level and needs. DaVinci Resolve is one of the top choices for professionals due to its advanced features. For beginners or casual users, tools like Filmora or HitPaw Online AI Video Enhancer are excellent options for quick and easy color correction. Adobe Premiere Pro is also a versatile choice for intermediate users.
Conclusion on Color Correcting Video
Color correction can seem intimidating, but with user-friendly tools like Filmora and HitPaw Online AI Video Enhancer, achieving stunning results is within anyone’s reach. If you’re editing for fun, work, or whatever purpose, knowing how to color correct video can surely improve your content and impress your audience. Experiment, learn, and let your creativity shine!
We know learning Filmora to color correct is a bit much for a beginner; that’s why HitPaw Online AI Video Enhancer can do this task with just a few clicks. Try it now, and you’ll love its simplicity and accessibility without having to learn complicated software.





Home > Learn > How to Color Correct Video Without Breaking a Sweat: A Beginner’s Guide!
Select the product rating:
Natalie Carter
Editor-in-Chief
My goal is to make technology feel less intimidating and more empowering. I believe digital creativity should be accessible to everyone, and I'm passionate about turning complex tools into clear, actionable guidance.
View all ArticlesLeave a Comment
Create your review for HitPaw articles