Want a Vocal-Free Track? Learn How to Remove Vocals in Adobe Audition Like a Pro!
Adobe Audition is arguably one of the top audio editing tools in the market, and if you are looking to turn your favorite song into a karaoke track or extract an instrumental for a remix, this software is your best bet.
Adobe Audition remove vocals quickly, but you need to know the exact settings and features to do this without facing any hiccups in the process. So that’s why, in this guide, we’ll show you step-by-step instructions to get this done in no time.
Create Now!Part 1. Adobe Audition Isolate Vocals: Key Features Explained
Adobe Audition is an amazing audio editing software with advanced features for removing vocals from songs. One of its most popular tools for this purpose is the Center Channel Extractor. Since vocals in most recordings are mixed to the center of the stereo field, this tool targets and reduces or removes these center frequencies to keep the surrounding instrumentals intact.
The Center Channel Extractor offers several presets, including a dedicated "Vocal Remove" setting, which users can customize for different results by adjusting parameters like Frequency Range and Pan Width.
Another feature that comes in handy is the Spectral Frequency Display. This unique visual display shows the audio’s frequency range, which makes it easier to isolate specific sounds, like vocal frequencies, which typically fall within certain ranges. You can fine-tune the exact frequencies for better results or to isolate vocals with precision.
Adobe Audition also includes Noise Reduction and De-Reverb effects, which help clear up residual sounds left after vocal removal. These effects are especially useful in songs with reverberation or complex instrumental layers. Together, these tools make Adobe Audition a great choice when you are looking to remove vocals while preserving the quality of the instrumental track.
Part 2. How to Remove Vocals Using Adobe Audition Center Channel Extractor: 6 Easy Steps
Removing vocals from a song or recording is a great way to create karaoke tracks or isolate instrumentals. For this purpose, you need to take help from software. Adobe Audition extract vocals flawlessly with its center channels extractor tool.
Here’s a step-by-step guide:
Step 1. Import Audio File
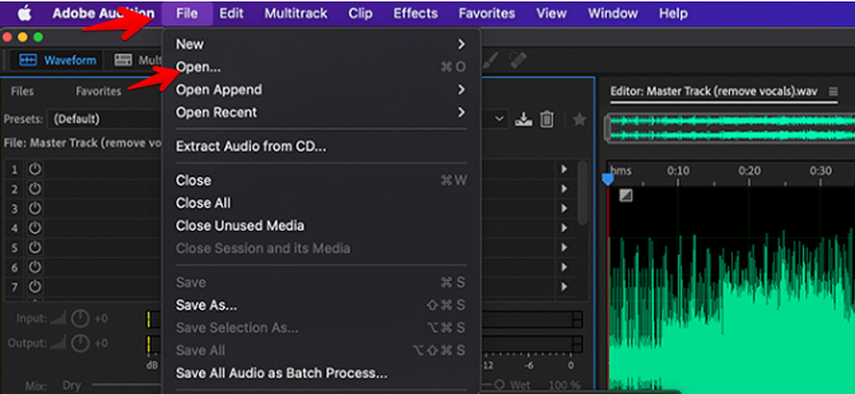
In the first step, open the Adobe Audition software on your PC, click “File > Open,” and select the song file. This can be a song or any recording with vocals and background music.
Step 2. Switch to Spectral Frequency Display
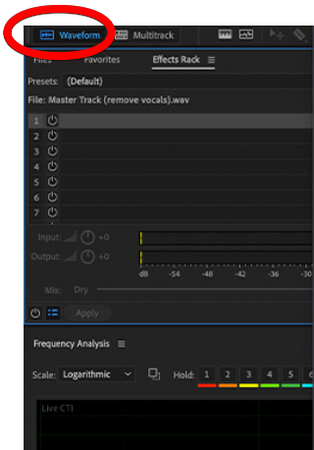
Next, click on the Waveform view to open the file in the timeline. For a more precise edit, click the “Spectral Frequency Display” (shortcut: Shift+D). This view will help you identify vocal frequencies in the recording.
Step 3. Use the Center Channel Extractor Effect
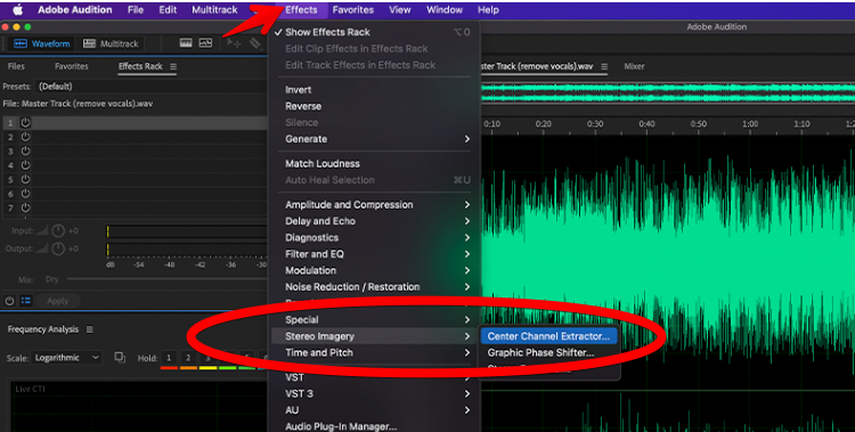
Go to “Effects > Stereo Imagery > Center Channel Extractor.” This tool is ideal for isolating or removing vocals, as they are often in the center channel.
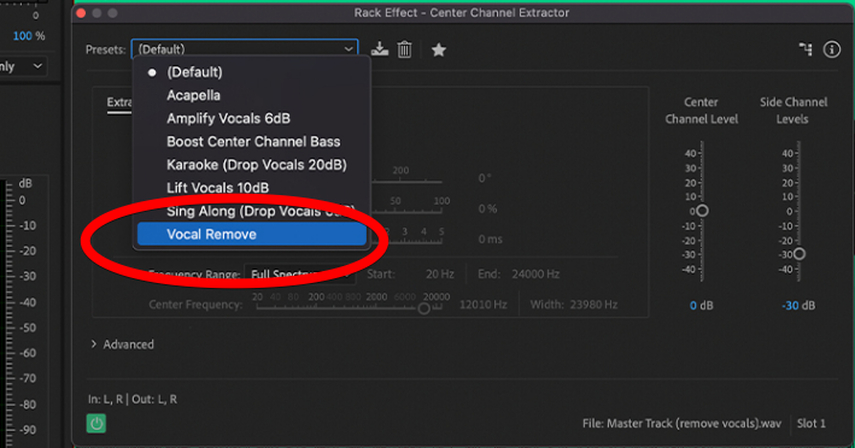
In the Center Channel Extractor panel, select the preset “Vocal Remove” from the dropdown menu.
Step 4. Adjust Frequency Range
In the Central Channel Extractor effect window, the “Frequency Range” custom settings allow you to target the specific frequencies that vocals typically occupy.
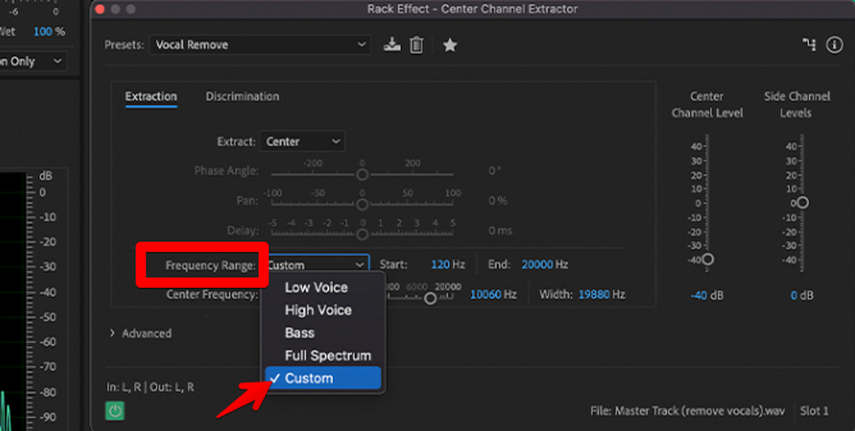
Here, set the “Lower Frequency” to around 120 Hz and the “Upper Frequency” to around 16,000 Hz. These values work well for most vocals but can be adjusted as needed to suit your recording.
Step 5. Fine-Tune the Extraction Settings
Under the “Center Channel Level” option, adjust the “Level” slider. Reducing it to around -40 dB will suppress most vocal frequencies.
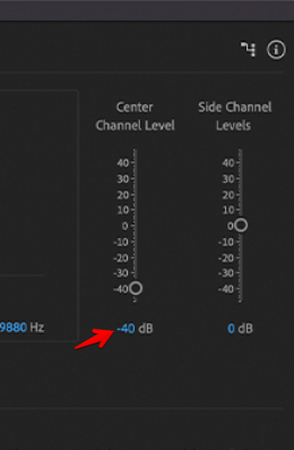
You can also adjust Side Channel Levels to increase background music clarity. Experiment with settings such as Pan Width and Phase Discrimination to get the best results for your specific audio.
Step 6. Preview, Readjust & Export
Click “Play” to preview your changes and listen carefully to see if the vocals are sufficiently reduced or removed. If some vocal sounds remain, further adjust the frequency and channel levels until the vocals are barely audible.
Also, use the “Noise Reduction” and “De-Reverb” effects to clean leftover sounds left after vocal removal.
Once satisfied with your adjustments, click “Apply” for Adobe audition voice removal. Adobe Audition will now process the audio, removing the vocals according to your settings.
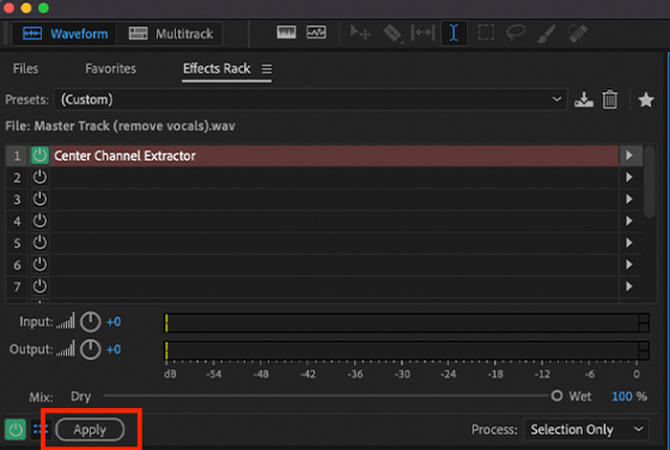
Finally, go to “File > Export > File” and choose your preferred audio format (e.g., MP3 or WAV) and click “Save.” Now you have an instrumental version of your song or recording!
Part 3. The Best Adobe Audition Alternative for Vocal Removal - HitPaw Online Vocal Remover
The real problem that many users face is Adobe Audition remove voice with a complicated process. You have to be tech-savvy to get a complete instrumental version of your favorite track. But what if you can get this done in a few minutes without downloading any software?
Well, HitPaw Online Vocal Remover is an amazing tool that can instantly extract or remove all vocals and leave you with a copy of the instruments-only version.
Let’s explore the steps:
Step 1: Open the HitPaw Vocal Remover Tool
First, get the high-quality audio or video file of the song from which you want to remove the lead vocals. Otherwise, you may not get clear and distortion-free results.
After that, go to the HitPaw Vocal Remover page and click “Login." Type your email and password and click the “Login” option again, or click “Continue With Google” and go through the on-screen prompts to log into your HitPaw Vocal Remover studio.
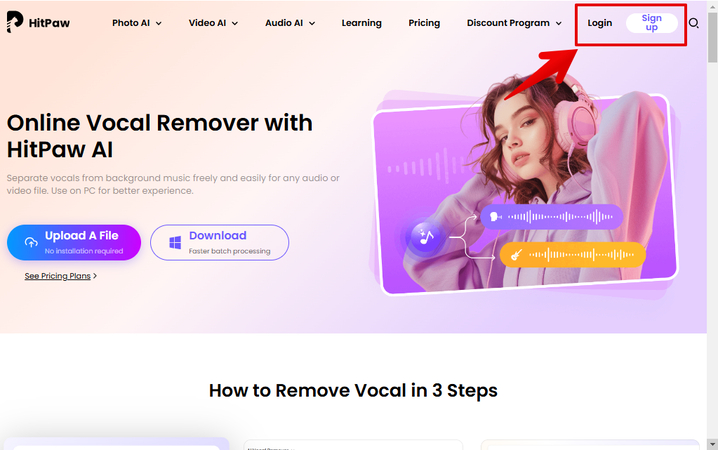
Otherwise, click “Sign Up” and use your credentials to create a new account.
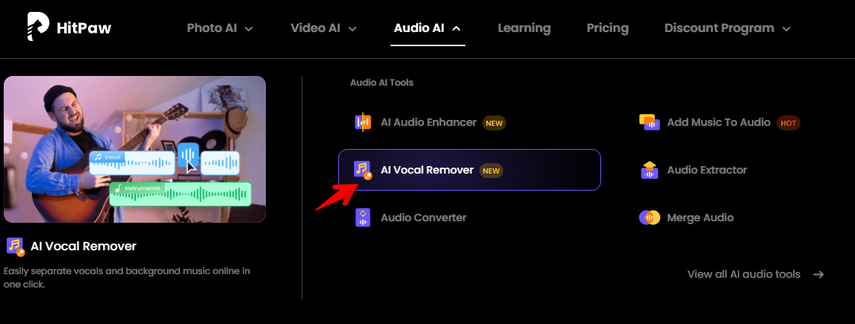
If you already have an account on HitPaw, click “Audio AI” at the top and select “AI Vocal Remover.”
Step 2: Upload the Song with Vocals
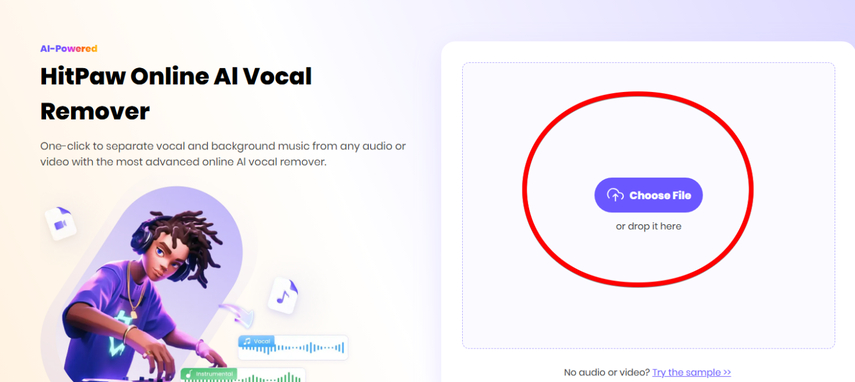
Next up, scroll down to the “Other AI Tools” section, hover over “AI Vocal Remover, and click the “Upload” option. Now, select the song you saved on your PC and click “Open.”

HitPaw Vocal Remover will import and open the file in a new window and start working on it.
Alternatively, click “Audio AI” on the top header, select “AI Vocal Remover,” and click “Upload a File” > “Choose File” to upload the song from your PC.
Step 3: Export the Song
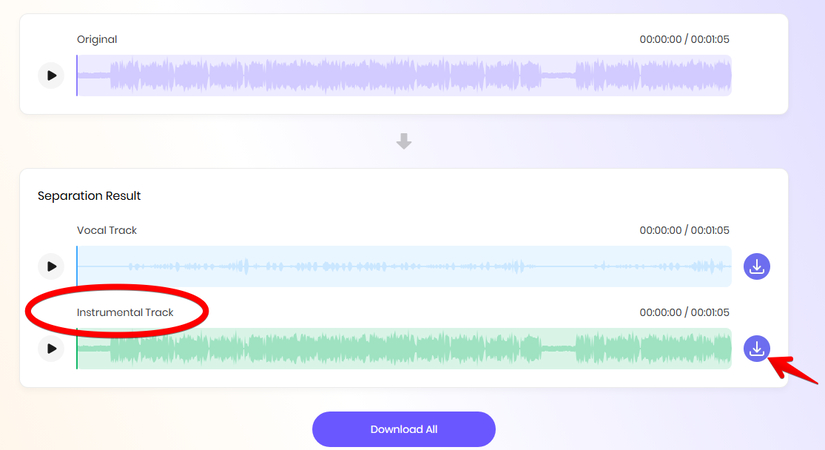
Now, the HitPaw Vocal Remover will give you two isolated tracks (vocal and instrumental) for your uploaded song.
Click “Play” next to “Instrumental Track” to make sure the vocals are separated and the original quality is intact. Finally, click the “Download” arrow beside the “Instrumental Track” to export the vocal-free version to your device for intended use.
Part 4. FAQs of Adobe Audition Vocal Removal
Q1. Can I remove vocals in Adobe Audition?
A1. Yes, you can remove or isolate vocals using Adobe Audition. To do this, open the audio file, then go to Effects > Stereo Imagery > Center Channel Extractor. Select the “Vocal Remove” preset, and adjust the settings under Frequency Range and Center Channel Level to achieve the best vocal reduction without affecting the instrumental quality.
Q2. Can Adobe Audition completely remove vocals?
A2. Adobe Audition can effectively reduce or isolate vocals, but complete removal depends on the track's quality and complexity. Songs with centered, clean vocals yield better results. However, traces of the vocals or other audio artifacts may remain, especially in tracks with heavy reverb or overlapping frequencies.
Q3. What is the best setting to remove vocals in Adobe Audition?
A3. The Center Channel Extractor’s “Vocal Remove” preset is a good starting point. Adjust the Frequency Range to cover typical vocal frequencies (around 120 Hz to 16,000 Hz) and fine-tune the Center Channel Level to suppress vocals further. Experimenting with Pan Width and Phase settings can also help refine results based on the specific track.
Q4. Which is better than Adobe Audition for vocal removal?
A4. If you don’t want to manually play around with different Adobe Audition settings to remove the vocals, HitPaw online vocal remover can do this job in a couple of minutes with the latest AI algorithms. Simply upload the song, wait for HitPaw Vocal Remover to analyze and separate the vocals from instruments, and then download the Instrumental track.
Conclusion on Adobe Audition Isolate Vocals
With Adobe Audition, removing vocals from a song is easier than ever for a clean instrumental track, which you can use for karaoke, remixes, or other uses. By mastering a few simple settings, you can quickly isolate the music and open up new possibilities for your audio.
However, If you're looking for a fast, user-friendly option to remove vocals without any downloads, try HitPaw Online Vocal Remover—just upload your file and let it work its magic!






Home > Learn > Want a Vocal-Free Track? Learn How to Remove Vocals in Adobe Audition Like a Pro!
Select the product rating:
Natalie Carter
Editor-in-Chief
My goal is to make technology feel less intimidating and more empowering. I believe digital creativity should be accessible to everyone, and I'm passionate about turning complex tools into clear, actionable guidance.
View all ArticlesLeave a Comment
Create your review for HitPaw articles