How to Make Your Body Shape Slim with AI
Everyone wants to look great in a photo, especially those who are a bit fat. Your belly might be poking out, or your torso is not your best feature. These days, you don't have to exercise for a whole year to be slim and then take a photo. You can get a slim body version of yourself in a recently captured photo by using software and mobile apps, and the best part is that it all happens in a matter of moments. In this guide, you are going to learn all about it and how to hide fat-ish elements in your picture and achieve a look you feel comfortable with while looking at it or sharing it with others.
Enhance Now!Part 1. How to Make the Body Slim with AI Using Luminar NEO
To adjust body proportions using AI and make it slim, Luminar NEO's Body AI tool simplifies the entire process into a few key sliders and tools. Here's a complete guide to help you through every step using the exact features inside Luminar NEO.
Step 1. Access the Body AI Tool
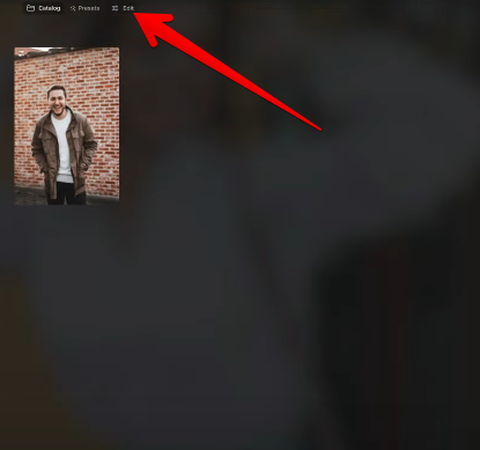
Download and install the Luminar NEO software on your PC, open it, and click + to upload your photo. As soon as you upload it, select it and click Edit to land in the Edit Module.
In the Edit module, go to the Portrait section under Tools. You'll see Body AI listed alongside other portrait tools like Skin, Face, and Portrait Bokeh. Click on Body AI to begin.
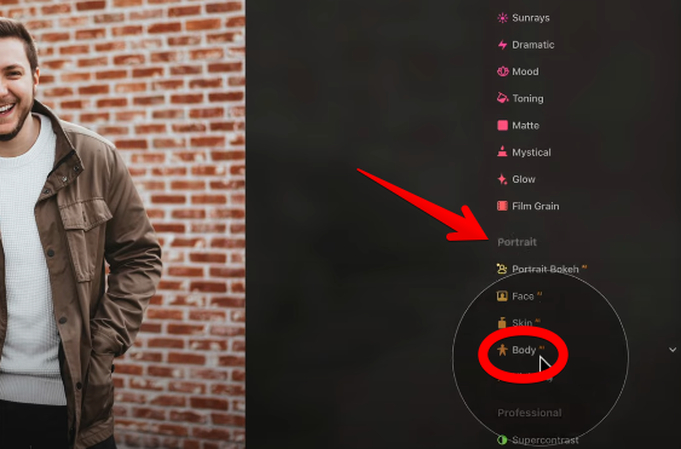
Step 2. Adjust the Shape Slider
The first slider under Body AI is called Shape. This directly affects the width of the subject's torso. When you slide it to the right, it makes the subject slimmer, and sliding it to the left adds more volume. To clearly see the difference, push the slider all the way to each end. This gives a proper view of how the change appears in real-time on your photo. As you are targeting the slim effect, slide to the right till you achieve the look you want.
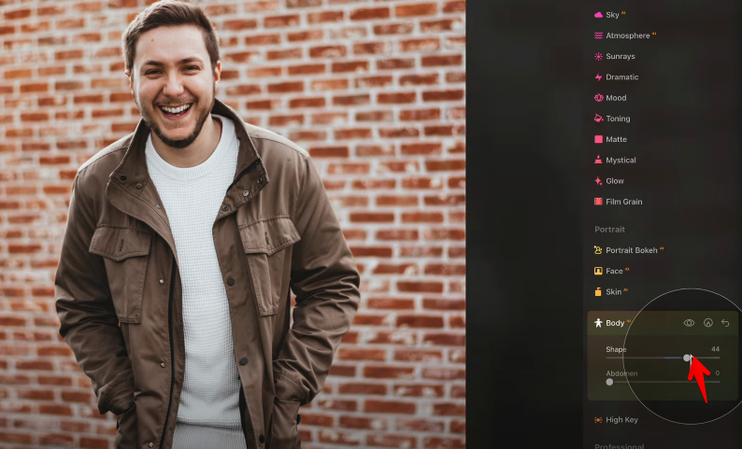
If you want to revert to the original, just double-click on the slider name to reset it.
Step 3. Use the Abdomen Slider
Next comes the Abdomen slider. This pinches the subject's abdomen to remove visible bulk. Again, slide fully in the right direction to make it slim.
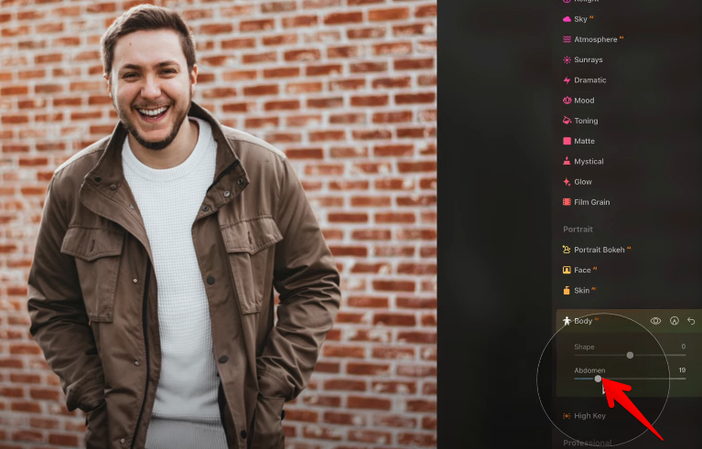
The abdomen adjustment targets the midsection specifically and is useful when refining the look of the body after using the Shape slider. Both sliders can be used together for stronger results.
Step 4. Refine with Face AI
Once you're done with the body, scroll to Face AI in the Portrait section. Here, there's a Slim Face option. This lets you narrow the face width so it aligns better with the slimmed torso and abdomen.
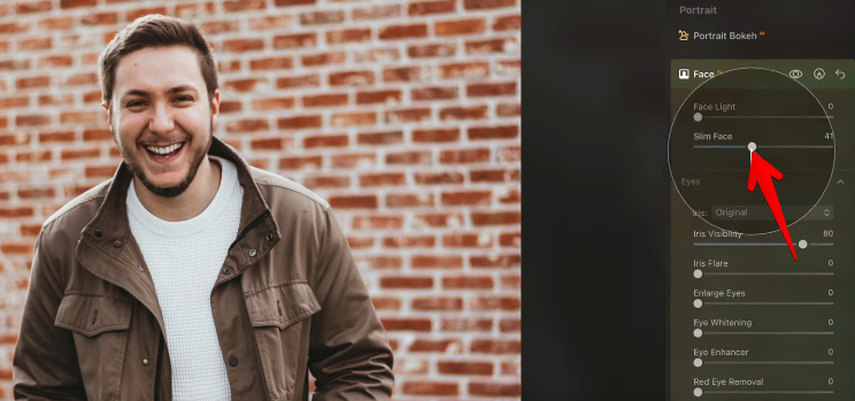
Apply small adjustments with the slider and watch how it complements the earlier edits. You can reset this as well with a double-click if needed.
Step 5. Apply to Group Photos
You can also apply Body AI edits to photos with more than one person. To do this, import a couple or group image into the Edit Module. Open Body AI and use the Shape slider. This affects all visible subjects. For example, slimming both individuals at once works well when both benefit from the adjustment. Then try the Abdomen slider-this may apply more effectively to one person than the other, depending on body positioning. Use the Slim Face slider next, though it might affect some faces more noticeably than others.
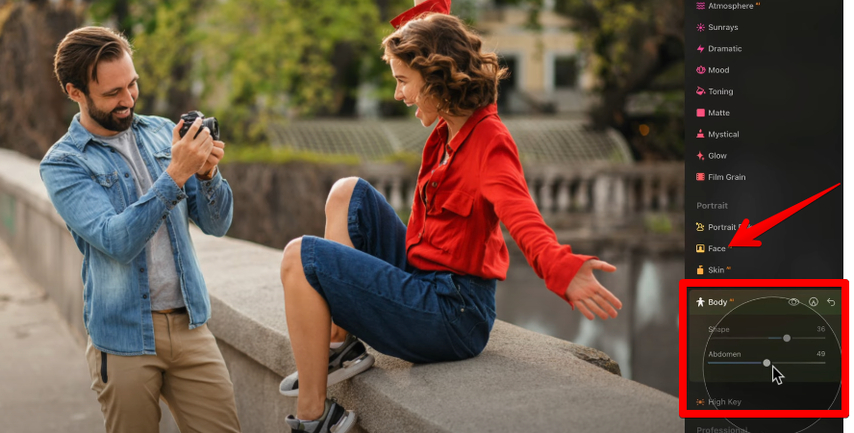
Step 6. Use the Masking Tool for Targeted Edits
When Body AI or Face AI edits impact all subjects in the image, you can use Masking to focus the adjustments on one person. Doing this is quite simple.
After finishing edits with Body AI or Face AI, both of these tools move to the Edits tab at the top, next to Tools.
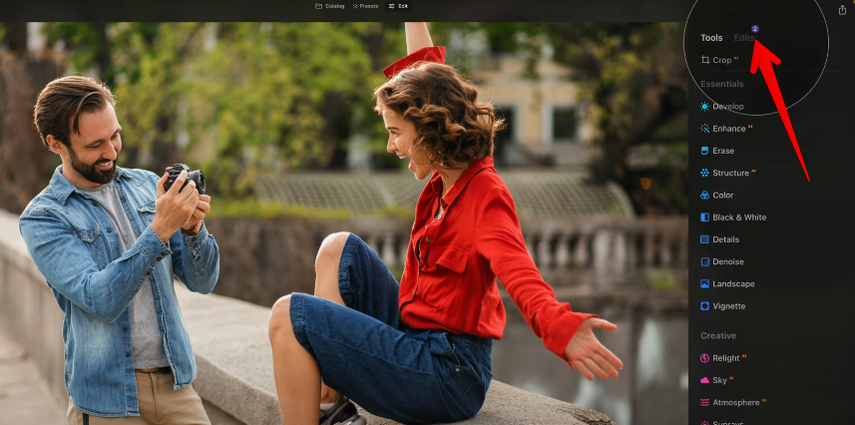
Click Edits and click on the tool you just used, such as Body AI, and hit Add Mask.
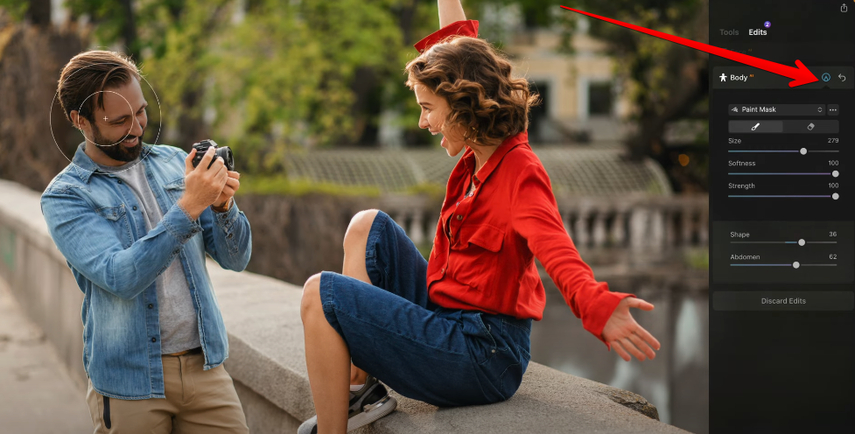
Choose Paint Mask, select the brush tool, and adjust its size. Then, paint directly over the subject by clicking on where you want to apply the effect on only one subject. The AI tool's effect will now appear only on the selected individual. Repeat the same steps with the Face AI tool if needed.
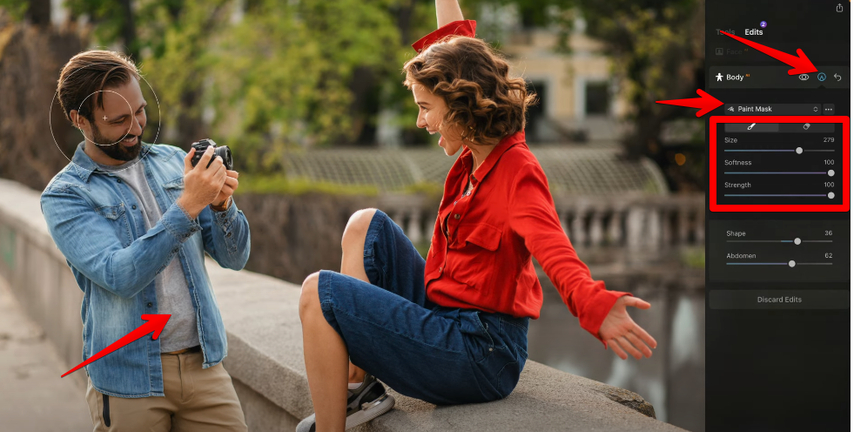
Step 7. Review Before and After
To compare the results, use the Before/After toggle in the Edits tab.
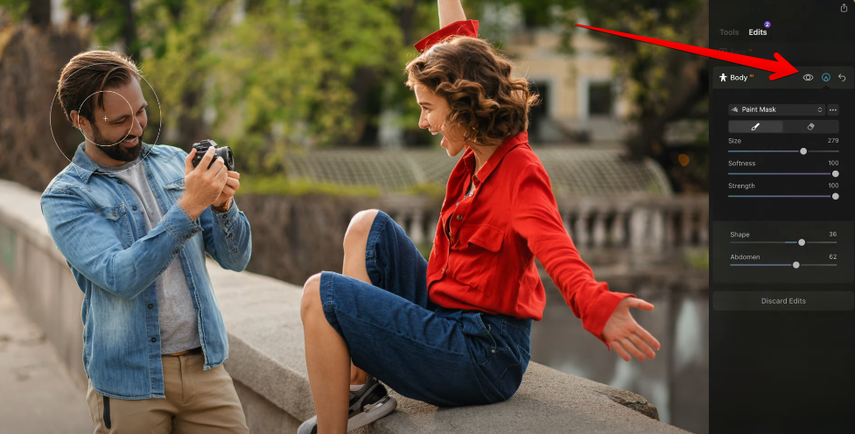
This allows you to evaluate how the Shape, Abdomen, and Face edits work together. If something doesn't look quite right, go back to any tool in the Edits tab and fine-tune the sliders.
By combining Body AI, Face AI, and the Masking tool inside Luminar NEO, you can slim your body and face, and selectively apply changes. This setup gives flexibility for single portraits or multi-subject photos.
Part 2. How to Apply the AI Slim Body Effect In the CapCut App
CapCut includes a built-in Slim tool inside the Retouch section that adjusts body proportions in your selfies using a simple slider. Here's a step-by-step walkthrough.
Step 1. Open CapCut and Start a Project
In the first step, just open the CapCut app on your phone and tap Edit from the main screen.
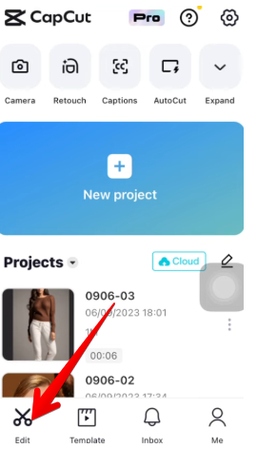
From there, select a photo or video from your gallery. The project then loads into your timeline.
Step 2. Navigate to the Retouch Section
Once the image appears in your editing space, tap on Edit at the bottom. After that, swipe left through the available tools until you reach Retouch.
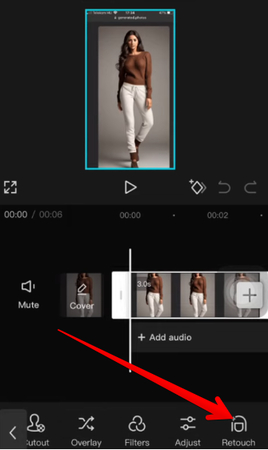
This section includes body and face adjustment options that are applied directly to the selected image.
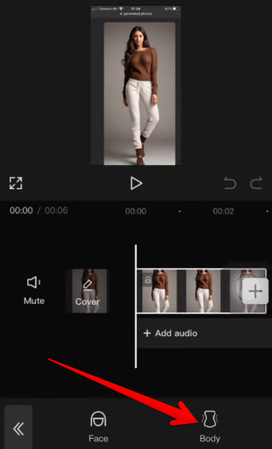
Step 3. Tap on the Body Option
Inside Retouch, go ahead and select the Body tool. A set of body-shaping features appears, including the Slim effect you're aiming to use.
Step 4. Apply the Slim Effect
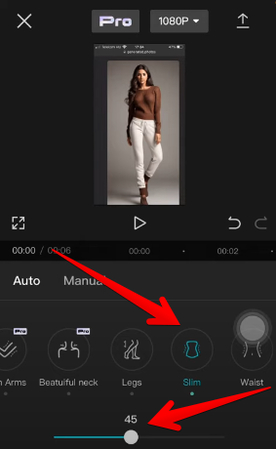
Now just tap on the Slim button. You'll see a slider at the bottom. Moving it to the right narrows the body shape in the image, and you'll notice the changes as soon as you slide. The adjustment updates in real time while you're dragging the slider across.
Step 5. Save Your Changes
Once the edit is done, simply tap the check mark icon in the bottom-right corner. That confirms the adjustment and brings you back to the main screen, where you can continue working on other parts of the photo if needed. For example, you can also slim your face when you tap Retouch below the timeline menu.
Part 3. How to Use the Slim Body AI Filter Using the PowerDirector App
A skinny generator can give a quick idea of body transformation, and PhotoDirector's AI Replace feature offers a direct way to try it on your photo. Here's how to use it step by step.
Step 1. Download and Install the PhotoDirector App
To get started, just install the PhotoDirector app on your phone. It's available for free in both the Android and iOS app stores.
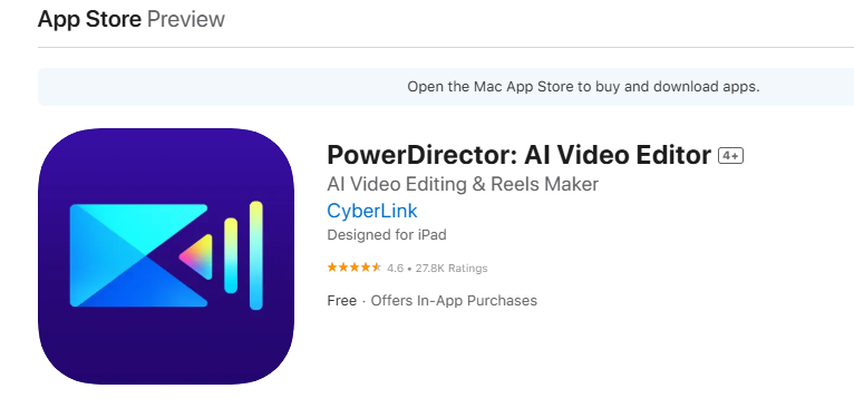
Once installed, you'll be ready to explore the AI-based tools it includes.
Step 2. Open AI Replace and Upload Your Photo
Once the app is set up, open it and go to the AI Replace option. After selecting it, choose a photo from your gallery that you want to edit. The tool loads the image and prepares it for the next steps.
Step 3. Brush Over the Body Area
There's a brush tool in there that you can use to select the marked parts of the body that you want to be slim.
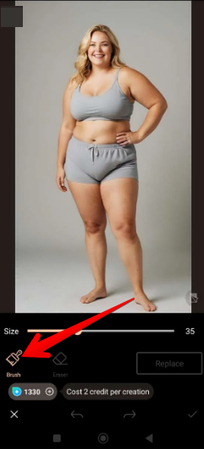
This can be around the waist, arms, legs, or the full body, depending on the changes you're going for. The effect applies only to the area that's been brushed.
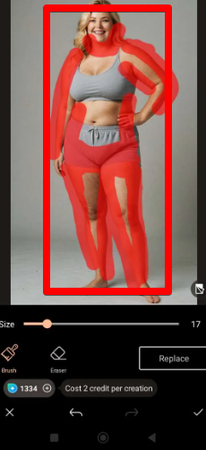
Step 4. Enter a Prompt
Now type in a simple prompt such as "slim body" or "weight loss effect." This tells the tool exactly what kind of transformation is expected from the edit. The AI uses the prompt to generate changes based on the selected body areas.
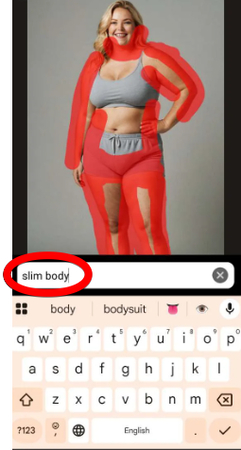
The tool processes the image in just a few moments and shows a new version based on your prompt. The result offers a slim body version of the original photo using the adjustments applied through AI Replace.
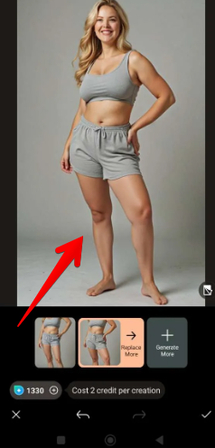
Part 4. Edit Your Slim Body Photo Using HitPaw FotorPea
After toning down your body features, you may want to edit it more so it looks great when you share it with someone or on different social media platforms. HitPaw FotorPea offers you all that. Let's explore all about it.
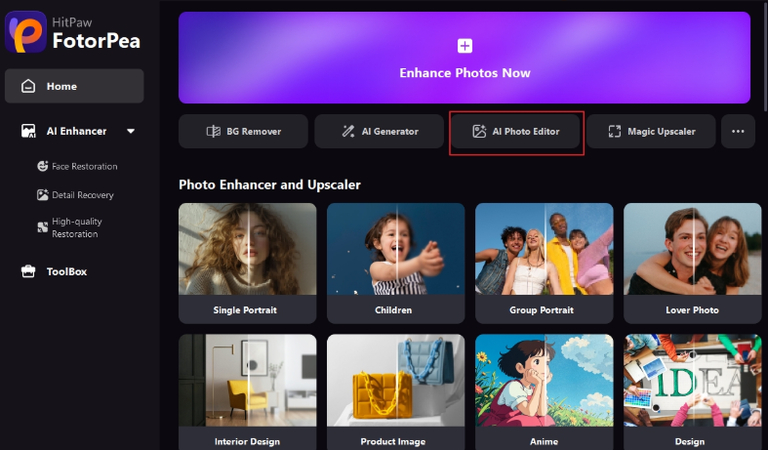
1.Once the software is installed, just open it up and from the main screen, click on AI Photo Editor. This is where all the editing options are stacked for quick access.

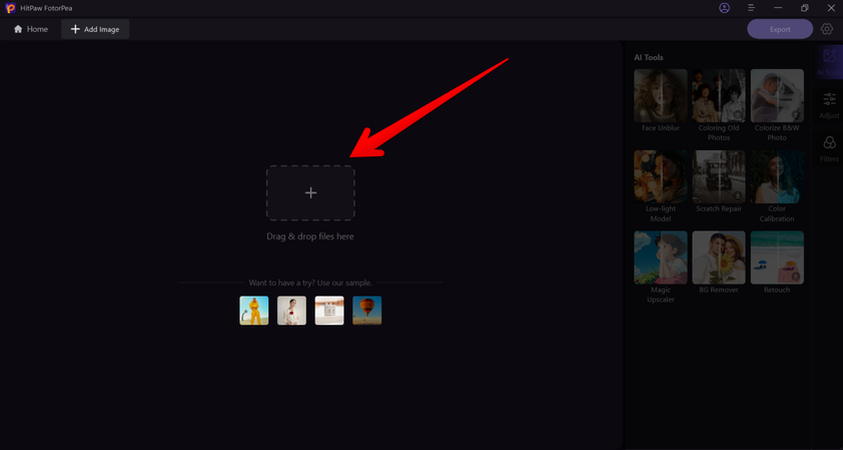
2.There's a "+" signon the screen that you can use to upload the slim body photo you want to edit. Once it's added, the workspace loads up with your image in view.

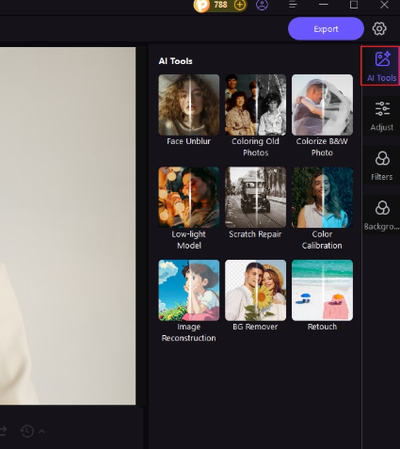
3.You'll find several AI tools listed on the right-hand panel. Choose the one that fits what you're trying to do. After selecting it, wait a few seconds for the tool to process the image automatically.

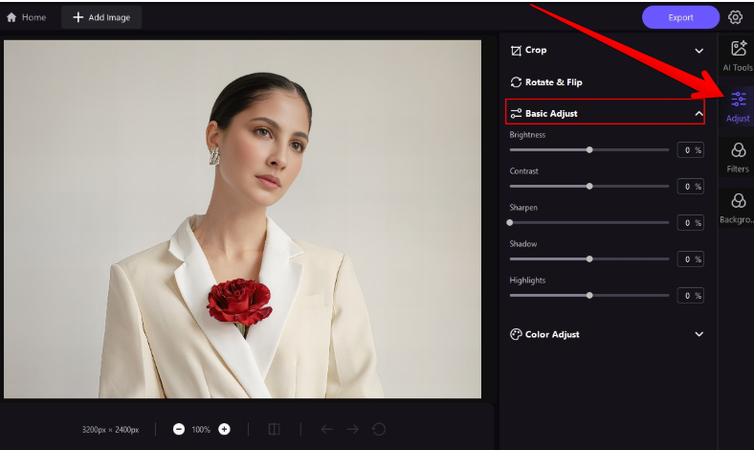
4.On the same right-hand side, there's an Adjust tab under AI Tools. It starts with a Crop option where you can resize, flip, or rotate the photo based on how you want it formatted. Scroll down to Basic Adjustment, where you'll get sliders for brightness, contrast, sharpness, and saturation. Each one reflects live changes in the image.

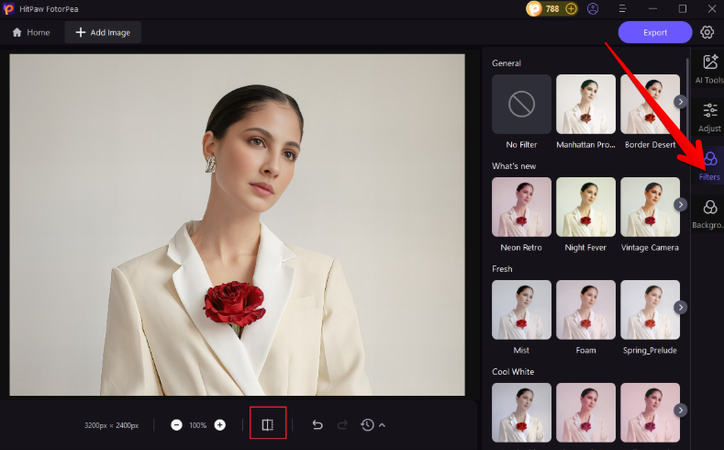
5.When the adjustments are done, head into the Filters tab and scroll through different looks. Try a few out and stop at the one that fits the photo well. Then, click the Compare button to view the before and after.

If you are satisfied, hit Export to download your edited image straight to your desktop folder.
Part 5. FAQs of Slim Body
Q1. What is a slim body?
A1. A slim body usually means that someone has a thinner shape with reduced visible fat around the waist, arms, and legs. It's not about a specific size but more about proportions that appear narrower. Some photo editors allow you to simulate this look in portraits through shaping tools.
Q2. Can AI make you look thinner?
A2. Yes, you can use AI-based tools to reshape parts of your body in a photo. Apps like Luminar Neo, CapCut, and PhotoDirector have sliders or prompts that adjust your waistline, limbs, and facial structure. These tools edit selected areas while keeping the rest of the image intact.
Q3. How to slim body in photo in iPhone?
A3. On iPhone, you can use the CapCut app by tapping into Retouch → Body → Slim, then sliding to adjust. In PhotoDirector, try AI Replace, brush the body area, and enter a prompt like "slim body." Both apps are available on the App Store.
Conclusion on Slim Body
Once you apply the slim body effect using tools like Luminar Neo, CapCut, or PhotoDirector, you can move on to styling your photo further. You can crop it for social media, adjust lighting with brightness and contrast, or add filters for a polished look using HitPaw FotorPea. If you're sharing it online or printing it out, these final touches give your edited image a sharper, cleaner finish that matches the change you've applied.






Home > Learn > How to Make Your Body Shape Slim with AI
Select the product rating:
Natalie Carter
Editor-in-Chief
My goal is to make technology feel less intimidating and more empowering. I believe digital creativity should be accessible to everyone, and I'm passionate about turning complex tools into clear, actionable guidance.
View all ArticlesLeave a Comment
Create your review for HitPaw articles