


How to Unblur CapCut Templates: Fix Blurry Videos
CapCut templates are widely used for creating trendy videos quickly, but many users run into one frustrating issue-blurry or low-quality results. Whether it's a TikTok edit or a personal project, poor video clarity can ruin the final look.
In this guide, you'll learn why CapCut templates appear blurry, how to fix common issues inside the app, and what to do when basic methods aren't enough. We'll also introduce a more advanced solution to truly unblur CapCut videos and improve overall quality.
Unblur Video Now!Part 1. Why is Your CapCut Template Blurry?
Blurry CapCut templates are usually caused by a mix of source quality, template limitations, and export settings. Instead of one single issue, it's often multiple factors working together. Here are the most common reasons:
1. Low-Resolution Source Files
If the photos or videos you upload are already low quality, CapCut cannot improve them. When templates zoom in or crop these assets, the blur becomes even more noticeable.
2. Built-in Template Compression
Many CapCut templates are designed for fast loading rather than high resolution. As a result, the original assets inside the template may already be compressed, leading to softer visuals.
3. Blur Effects in the Template
Some templates intentionally include blur effects (such as background blur or motion blur) for stylistic purposes. If not adjusted, these effects can make your video look unintentionally blurry.
4. Incorrect Export Settings
Exporting at low resolution (like 720p) or with a low bitrate can significantly reduce video quality. Even high-quality edits will look blurry if exported with poor settings.
5. Preview Quality Misleading You
CapCut often shows lower-quality previews to improve performance. This can make your video look blurry during editing, even if the final export is clearer.
6. Social Media Compression
Platforms like TikTok or Instagram compress videos after upload. This can reduce sharpness and introduce artifacts, especially if your original export wasn't high quality.
Part 2. How to Remove Blur in CapCut (Basic Fixes)
Before turning to advanced tools, it's important to try the built-in options in CapCut. While CapCut cannot truly "restore lost details," it can help improve clarity and reduce the appearance of blur in many cases. These methods are especially useful when the issue comes from settings, filters, or minor quality loss.
Method 1. Adjust Export Settings
One of the easiest ways to fix blurry CapCut videos is to export them at the highest possible quality. Many users overlook this step and accidentally export in lower resolution.
Steps:
- 1.Tap the Export button in CapCut.
- 2.Choose the highest available resolution (1080p or 4K).
- 3.Set the frame rate to 30fps or 60fps.
- 4.Increase bitrate if the option is available.
- 5.Export the video again and check the result.

Method 2. Remove Blur Effects from Template
Some CapCut templates intentionally include blur effects for style or transitions. If you don't need them, removing these effects can instantly improve clarity.
Steps:
- 1.Open your project in CapCut.
- 2.Tap on the clip or layer with the blur effect.
- 3.Go to "Effects" or "Adjust".
- 4.Locate blur-related filters (Gaussian blur, motion blur, etc.).
- 5.Reduce or remove the effect completely.
Method 3. Adjust Sharpness and Clarity
CapCut includes basic editing tools that can make your video appear sharper. While this doesn't truly unblur footage, it can improve visual perception.
Steps:
- 1.Select your video clip.
- 2.Tap "Adjust".
- 3.Increase Sharpness slightly.
- 4.Adjust Contrast and Clarity for better detail definition.
- 5.Avoid over-adjusting, as it can create noise.
Method 4. Replace Low-Quality Media
If your source files are the problem, replacing them is often the best solution. High-quality input always leads to better output.
Steps:
- 1.Identify clips or images that look blurry.
- 2.Replace them with higher-resolution versions.
- 3.Avoid screenshots or heavily compressed files.
- 4.Re-export your project.
Part 3. Why It Still Looks Blurry After Export
Even after adjusting settings and removing blur effects, your CapCut video may still look blurry. This usually comes down to limitations in how video editing tools handle quality and compression.
1. Export Compression Reduces Detail
CapCut compresses videos during export to reduce file size. This can cause loss of fine details, especially in high-motion scenes or videos with complex textures.
2. Double Compression from Social Platforms
After exporting, uploading your video to platforms like TikTok or Instagram leads to another round of compression. This "double compression" can significantly reduce clarity.
3. Original Footage Was Already Blurry
If your source video or template assets were low quality, the blur is already "baked in." Basic editing tools cannot recover details that were never captured.
4. Sharpness Adjustment Has Limits
Increasing sharpness in CapCut only enhances edges-it doesn't truly restore missing details. Overusing it can even make the video look unnatural or noisy.
5. CapCut Is Not an AI Restoration Tool
CapCut is designed for editing, not for rebuilding image details. It lacks advanced AI models needed to truly unblur videos or enhance resolution.
Because of these limitations, many users turn to tools like HitPaw Online AI Video Enhancer. Unlike basic editing adjustments, AI-based enhancers can analyze frames, recover lost details, and genuinely remove blur from video.
Part 4. Best Solution to Unblur CapCut Videos
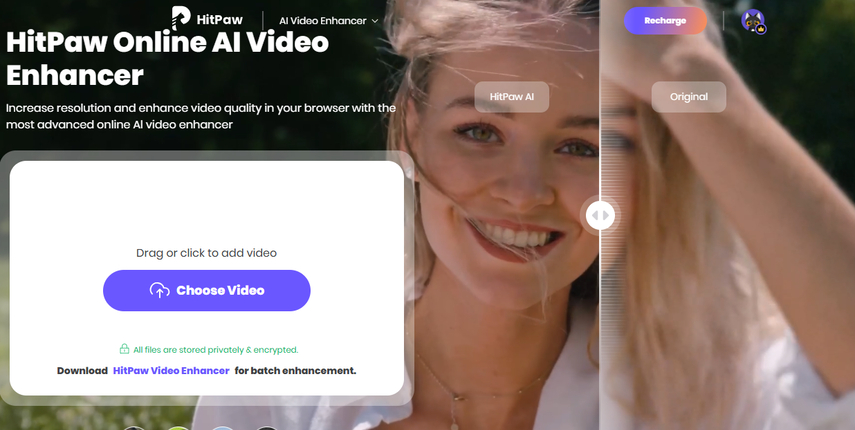
If you want to truly unblur a CapCut template and restore lost quality, using an AI-powered enhancer is the most effective solution. HitPaw Online AI Video Enhancer is designed specifically for this purpose, helping users improve resolution, reduce noise, and recover fine details with just a few clicks. It's especially useful for videos that remain blurry even after exporting at high settings.
Key Features:
- Unblur videos and improve video resolution to 4K or even 8K intelligently
- Rebuild lost details to make genuinely blurry footage look clearer
- Remove grain and blocky artifacts caused by CapCut exports or social media compression
- Bring back textures in faces, hair, and backgrounds
- Provide scene-adaptive AI models such as Face Model, Denoise Model, Animation Model, Detail Recovery Model and more
- Unblur videos in a few clicks without needing technical adjustments or professional editing experience
How to Unblur Video Online:
Step 1.Access the official page of HitPaw Online AI Video Enhancer and upload your blurry video.
Step 2.Select an AI model based on your needs, then choose the desired resolution such as 1080P or 4K. Click Preview to start processing.
Step 3.After a few seconds, preview the enhanced result. If satisfied, download the final video to your device.
Part 5. Frequently Asked Questions
Q1. Can you remove blur on CapCut?
A1. You can reduce blur by adjusting sharpness, removing blur effects, and exporting at higher quality. However, CapCut cannot fully restore lost details in blurry footage.
Q2. How do I unblur a photo on a CapCut template?
A2. Try replacing the image with a higher-resolution version and adjusting sharpness. For better results, use an AI image or video enhancer to restore clarity.
Q3. How do I blur a template on CapCut?
A3. To add blur, select your clip, go to "Effects," and apply a blur filter such as Gaussian blur. You can adjust the intensity based on your needs.
Conclusion
Blurry CapCut templates are often caused by low-quality source files, compression, or incorrect export settings, but many of these issues can be improved with simple adjustments inside the app.
In this guide, we explored practical ways to fix blur in CapCut and explained why some videos still appear low-quality after export. For those situations, tools like HitPaw Online AI Video Enhancer provide a more advanced solution by actually restoring details and improving resolution. Try it today and take your CapCut videos from blurry to sharp in just a few clicks.
Unblur Video Now!


Home > Learn > How to Unblur CapCut Templates: Fix Blurry Videos
Select the product rating:
Natalie Carter
Editor-in-Chief
My goal is to make technology feel less intimidating and more empowering. I believe digital creativity should be accessible to everyone, and I'm passionate about turning complex tools into clear, actionable guidance.
View all ArticlesLeave a Comment
Create your review for HitPaw articles