How to Freeze Frame a Shot and Extend It Cleanly
If you want to know how to freeze frame, this guide walks you through three video editing tools that editors rely on. You'll see how freeze frames work in Premiere Pro, DaVinci Resolve, and HitPaw Edimakor. Every one of them is explained clearly to help you out as much as possible. Furthermore, if you're looking for create a video in the first place, just click below button to get one. Anyway, let's start!
Generate Now!Part 1. How to Freeze Frame in Premiere Pro
In this section, you are going to look at three ways to freeze your footage using the frame hold options in Premiere Pro. You can use this to create a snapshot effect. You can also use it to extend the duration of a title animation. Besides that, there are many other ways that you can use this effect, which makes this a must-know technique for every editor.
Option 1. How to Freeze Frame Using Add Frame Hold in Premiere Pro
Inside Premiere, you already have a clip on the timeline that you are going to freeze right at this point. You first need to make sure that the playhead is at the point that you want to freeze.
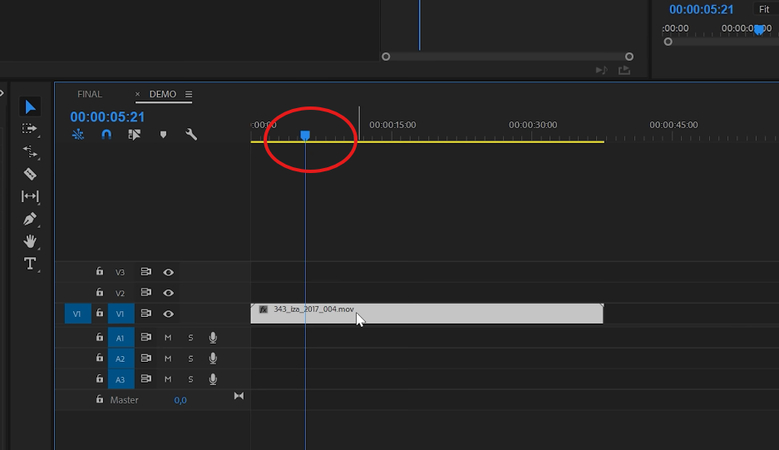
Then select the clip on the timeline that you want to freeze and right-click on it to open the video options. After that, you select Add Frame Hold.

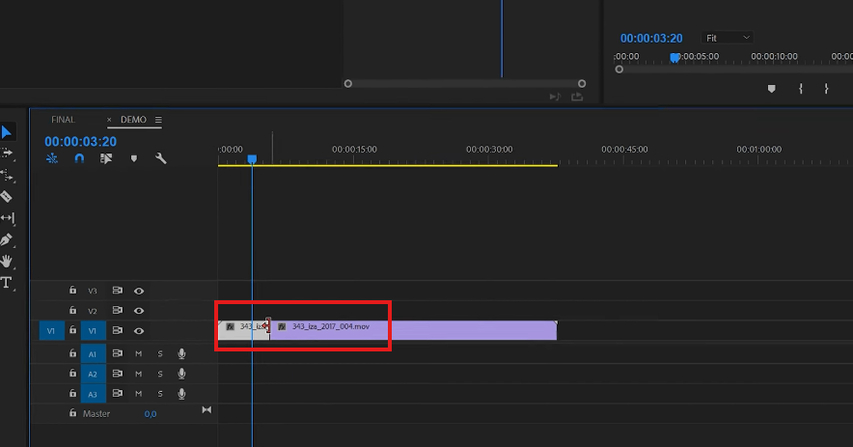
This cuts the clip into two parts. On the left, you still have the clip as it is. On the right, you get a frozen frame at the position of the playhead. The second part uses the rest of the clip as the standard duration, and you can also extend this if you want.
Option 2. How to Freeze Frame Using Insert Hold Frame Segment in Premiere Pro
There is another option as well. You again need to go to the point that you want to freeze. Next, right-click on the clip and select Insert Frame Hold Segment.
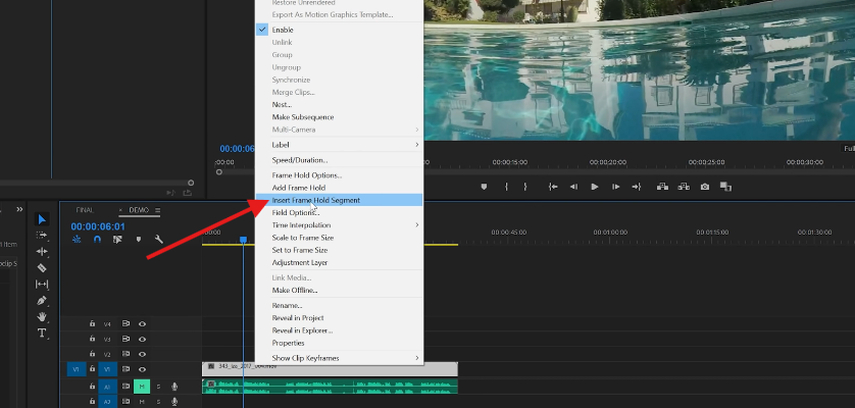
This also splits the clip into two parts at the position of the playhead. Premiere then inserts a two-second frozen frame between the two parts.
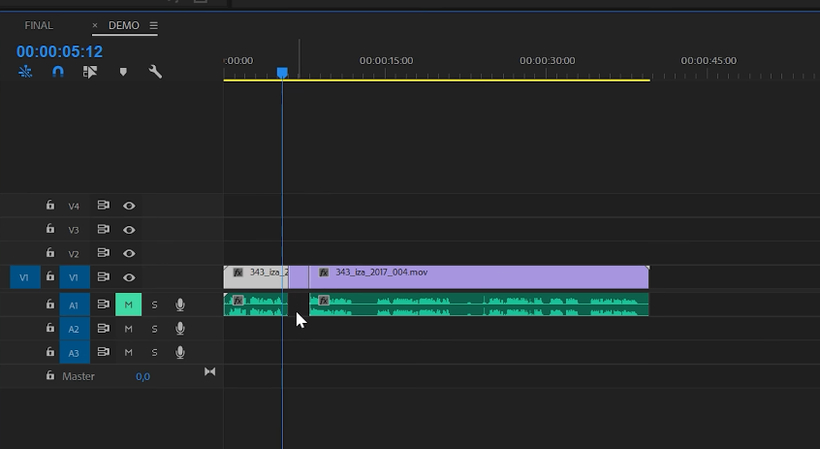
This option also splits and separates the audio track. If you want, you can extend the duration of the frozen part between the other two clips. You do this by holding the Ctrl key combined with the left mouse button and dragging the frozen clip to the right.
Option 3. How to Freeze Frame by Exporting Still Images in Premiere Pro
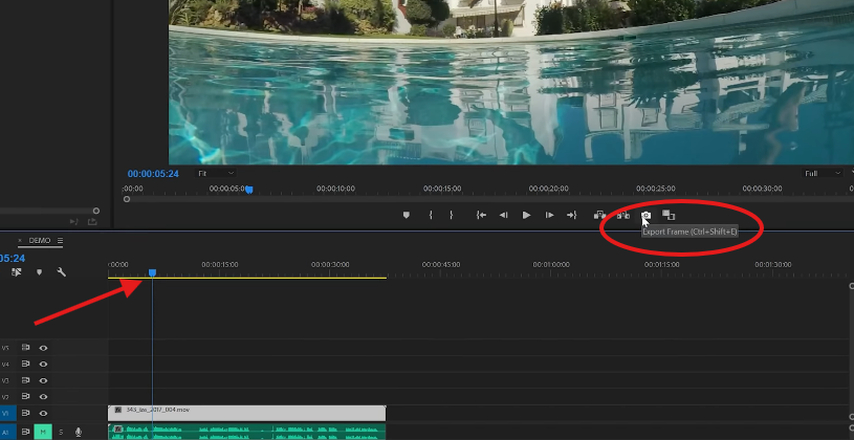
For the third option, you first need to put the playhead at the point that you want to freeze. At the bottom of the Program Monitor, you find the camera icon that you use to export a single frame.
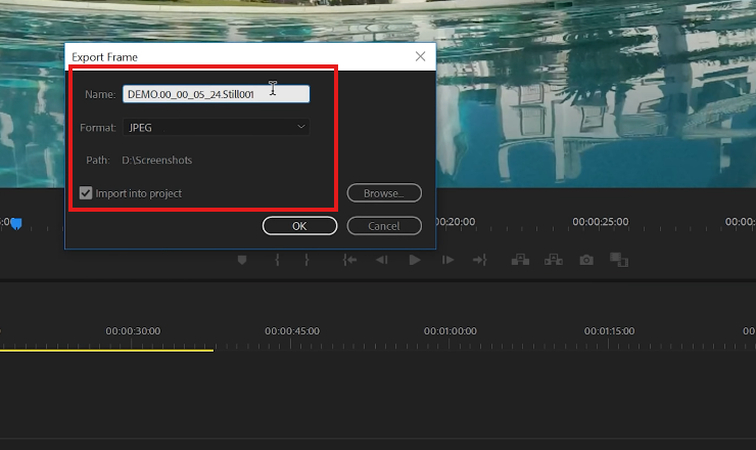
You can change the name of the export here, and you also need to select a format. In most cases, JPEG or PNG is the better option.
You can also select a directory for the exported frame. There is an option to import the frame directly into the current project.
After you click OK, you'll find the image inside the Project panel. You can then cut the clip on the timeline, separate it, and place the exported frame between the two parts.
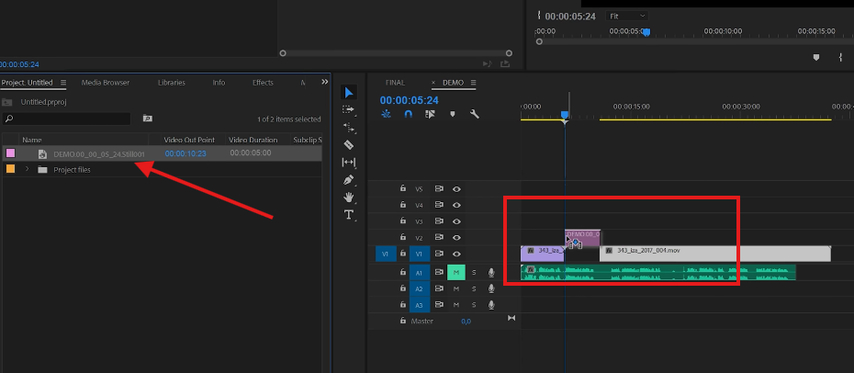
This gives you the same result as the other two options, and you can extend it by pressing & holding the Ctrl key and dragging it.
Option 4. How to Freeze Frame Using Time Remapping in Premiere Pro
What you are going to do here is time remapping, which is a way to play around with the speed of a clip. You can change the clip to slow it down to 1%, which freezes the frame, and then back to regular speed. To start, you right-click on the clip and go to Show Clip Keyframes, then Time Remapping, and then Speed.
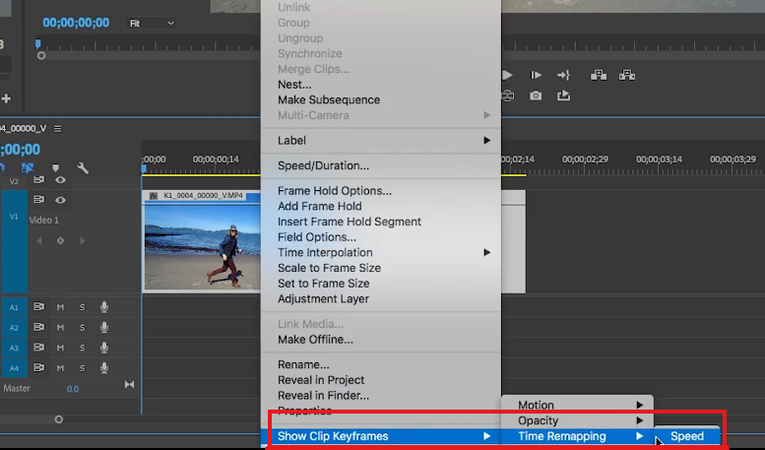
After doing this, the clip changes, and a blue line appears. The very top of this blue line represents 100 percent speed.

There is a Pen tool to set points that control the speed. Move to the point in the clip where the slowdown should start. Click using the Pen tool, or you press P on the keyboard to activate it. Then, create the second point. These two points define where the speed change happens.
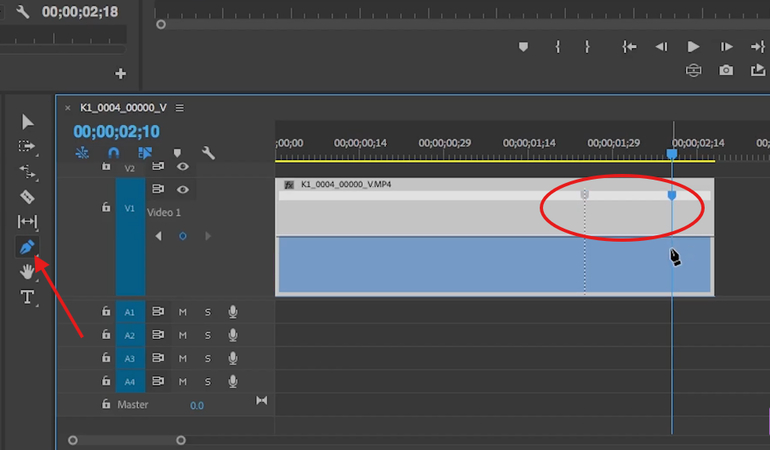
Next, press V on the keyboard to return to the Selection tool. When you lower the blue line between the points, the clip slows down and becomes longer. When you lower the line, the percentage drops below 100 percent. Since the clip needs to slow down and freeze, you need to bring it down to around 1 percent.
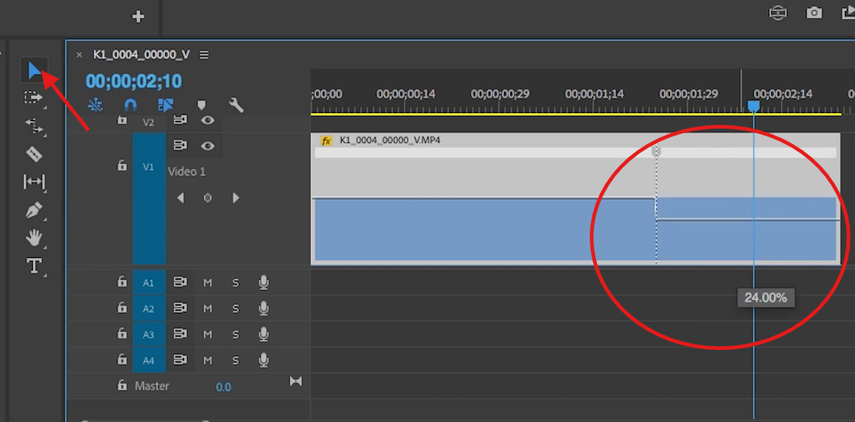
Now, if you play the clip back, it runs at normal speed, suddenly slows down and freezes, and then returns to full speed. To smooth this transition, you can create a ramp between the speed changes. You can click on the keyframe point, and it splits to form a transition.
This creates a gradual change from normal speed to slow speed freeze frame instead of an abrupt shift.
Part 2. How to Freeze Frame in DaVinci Resolve
If you have ever wanted a freeze frame in DaVinci Resolve, you have probably clicked around the menu options, found something called Freeze Frame, clicked on it, and immediately discovered it did not exactly do what you wanted. Today, you will see three methods for freezing the frame in DaVinci Resolve, and then you can choose the one that works best for your situation.
Way 1. How to Freeze Frame From the Clip Menu
So let's look at the first method. You are here in DaVinci Resolve on the Edit page. Let's freeze frame using the most direct technique. Put the playhead to where you want to freeze the frame. Then, select Clip, and now you choose Freeze Frame, and the whole clip is frozen on that frame. Before the playhead, after the playhead, everything.

This can be useful, but it is usually not exactly what you want to do, so you press Ctrl Z to undo that. Now the video is back to normal.
Way 2. How to Freeze Frame Using Change Clip Speed
With the playhead in position, right-click on the clip, then choose Change Clip Speed.
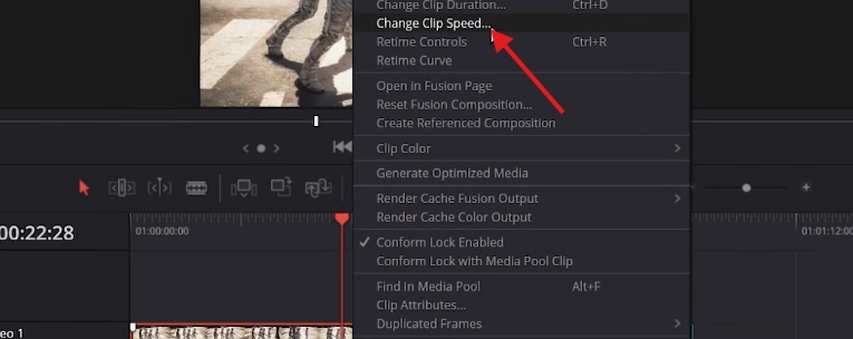
Here, you have the option to check Freeze Frame, so you check that, and then click Change.

What this does is freeze the frame after the playhead. If you back up a bit and play, then once it crosses that edit point, the frame is frozen for the rest of the clip. This method is actually pretty good if you want to freeze the frame and then move on to another clip like this.
Here, you can change the duration of the frozen frame pretty easily. You can use the Trim Edit tool, and you can make it longer or shorter just by dragging. Remember that the Trim Edit tool will move the next clip as needed, so if the Trim Edit tool is selected and you extend the frozen frame, the next clip is pushed to the side.

However, if you use the Selection tool, the arrow, this will overwrite the next clip. If you push it this way, you can see it is overwriting. It is going to depend on what you want to achieve, but you can bring this back anytime.
Way 3. How to Freeze Frame Using Retime Controls
Finally, let's look at the most flexible method, and this is to use the Retime Controls. To do this, right-click on the clip and choose Retime Controls, and this gives you many controls.
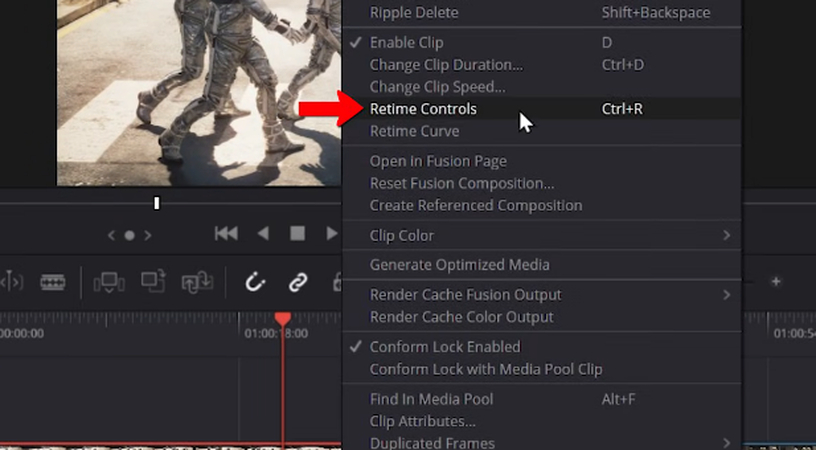
So 100 percent is the default state. So far, nothing has changed how the clip plays. You can position the playhead where you want, then you can click the dropdown here, and you can choose Freeze Frame.
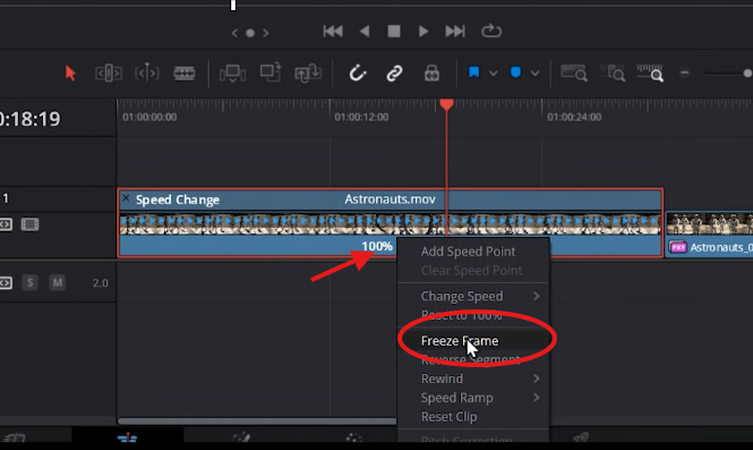
Now you have a freeze frame in the middle of the clip. You can see it stops, and then it starts playing again.
What is useful about this is that you can easily change the duration. You can drag these handles here to make the freeze frame go longer. Be sure to select the Edit tool if you do not want to overwrite the next clip. When you move this, you can see it pushes the next clip sideways. If you use the arrow, the Selection tool, it overwrites the next clip, so you remember the difference between those tools.
You can easily change the duration of the frame, and when the frame ends, the clip continues playing again. If you want flexibility when freezing a frame in the middle of a clip, using the Retime Controls is the way to go.
Part 3. How to Freeze Frames Using HitPaw Edimakor
Premiere Pro and DaVinci Resolve might be a bit too technical for you, and if you are a beginner, HitPaw Edimakor offers you two ways to freeze your frames within the same clip or split two videos.
Way 1. How to Freeze Frame Using the Snowflake Icon
Import your video into HitPaw Edimakor and move it to the timeline below. Then, select a point, click the snowflake icon showing on top of the timeline menu, and this will instantly create a freeze frame.
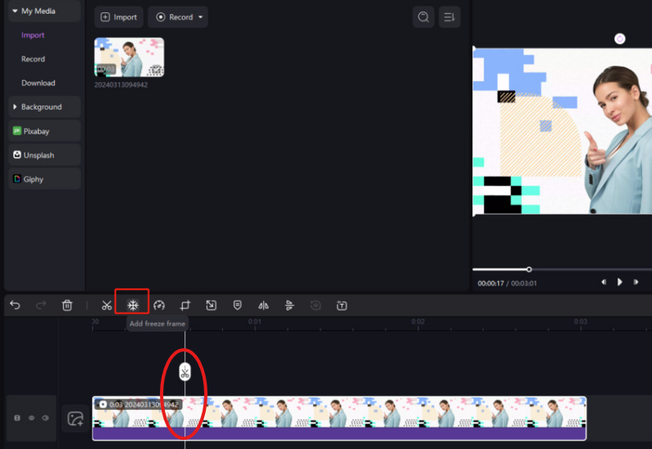
Way 2. How to Freeze Frame Using a Still Image and Split the Video
Import your video. After the file appears in the Media Box, drag its thumbnail down to the Timeline located at the bottom of the interface.
Next, move the Playhead (Skimmer) to the exact frame you want to save as an image. Then, click the Snapshot icon located below the Preview window.
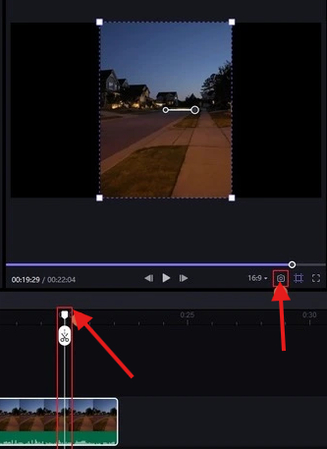
A small thumbnail of the captured frame appears at the bottom-right corner. Click the folder icon on that thumbnail to open the location where the snapshot is stored.
Note: The snapshot thumbnail only stays visible for a few seconds, so the folder icon needs to be clicked right away. If it disappears before that, the image is still saved. You can find it in "C:\Users\<your name>\Documents\HitPawEdimakor\Snapshots," which is the default folder used by HitPaw Edimakor for snapshots.
Bring the saved snapshots back into the editor using the same import process used earlier. The images load into the Media Box and become available for use on the Timeline.
Note: If the video file already appears in the Media Box, the Import Files button may not be visible. In that case, click Import from the upper-left corner of the Media Box, navigate to the snapshot folder on your computer, and import the images from there.
Finally, place the image at your desired point in the timeline, right-click on it, and select Add Freeze Frame.

Part 4. FAQs of How to Freeze Frame
Q1. How does freeze frame work?
A1. A freeze frame is when a single frame from a clip is paused and held on screen for a set time instead of playing forward. Editing apps grab that exact frame and repeat it, so motion stops while the timeline keeps moving. You usually use it to highlight a moment, extend a shot, add text, or smoothly move from one clip to another without breaking the flow.
Q2. How do you create a freeze frame?
A2.
Creating a freeze frame depends on the editor you use, but the idea remains simple across tools. In Premiere Pro, you place the playhead on the exact frame you want, right-click the clip, and use options like Add Frame Hold, Insert Frame Hold Segment, or Time Remapping to hold a frame and control its duration on the timeline.
In DaVinci Resolve, you get more than one way. You can use Freeze Frame from the Clip menu, enable it through Change Clip Speed, or use Retime Controls to freeze a frame in the middle of a clip and adjust its length.
If you want something quicker and beginner-friendly, HitPaw Edimakor gives you a direct way to freeze a frame. You can place the clip on the timeline and click the snowflake icon to add an auto freeze frame, or you can capture a snapshot, add it to the middle of your clip, and select Add Freeze Frame while right-clicking on it.
Conclusion on How to Freeze Frame
Now that you understand how to freeze frame, picking the right tool becomes much easier. Premiere Pro and DaVinci Resolve give you multiple ways to lock a moment exactly where you need it, while HitPaw Edimakor offers a more straightforward path if you want faster results. After trying these options, you can choose the one that fits your editing style and move forward with confidence.
Generate Now!




Home > Learn > How to Freeze Frame a Shot and Extend It Cleanly
Select the product rating:
Natalie Carter
Editor-in-Chief
My goal is to make technology feel less intimidating and more empowering. I believe digital creativity should be accessible to everyone, and I'm passionate about turning complex tools into clear, actionable guidance.
View all ArticlesLeave a Comment
Create your review for HitPaw articles