Dark Videos Ruining Your Shots? Here's How to Brighten Video in Premiere Pro!
Video editing often involves improving footage to make it visually clear for viewing. One common issue editors, including you, face is the clip is too dark and unclear. However, there are software that can quickly fix this issue for you, and Adobe Premiere Pro is one such tool that can adjust brightness while retaining video quality.
Here’s a complete guide to how to brighten video in Premiere Pro, followed by some practical tips to ensure the best results. We’ll also introduce you to the best online alternative to Adobe Premiere Pro so you can do this job without downloading or installing software.
Part 1. How to Brighten a Clip In Premiere Pro
The Effects panel in Adobe Premiere Pro has dedicated brightness and contrast adjustment settings that you can use to brighten your video. This method is a lot easier than others and requires very little knowledge of the tool, so it works great for newbies as well.
Below are the steps for how to brighten video in Premiere Pro:
Step 1. Import Your Footage into Premiere Pro
Begin by opening Adobe Premiere Pro and creating a new project. For this, launch Premiere Pro, go to “File” > “New Project,” and name your project. Next, drag and drop your video file into the Project Panel or use the “File” > Import option to locate your video file.
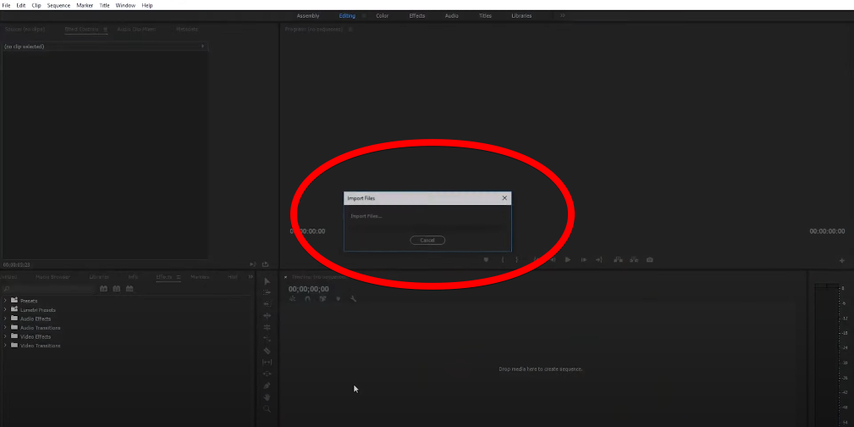
Once your footage is imported, drag it to the timeline to start editing.
Step 2. Access Brightness and Contrast in the Effects Panel
Next, click “Effects” in the left pane and search “Brightness” or “Contrast.” This way, you’ll see the “Brightness & Contrast” menu under the “Video Effects” option.”
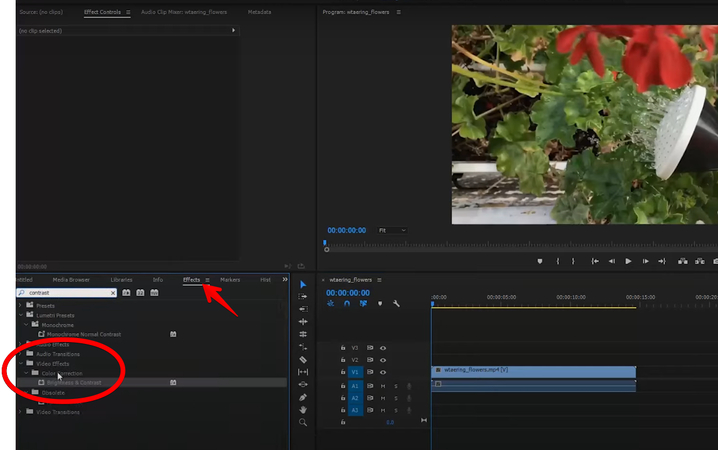
Now drag the “Brightness & Contrast” option to the timeline, and this will open a new “Video Effects: window on the left-top menu.
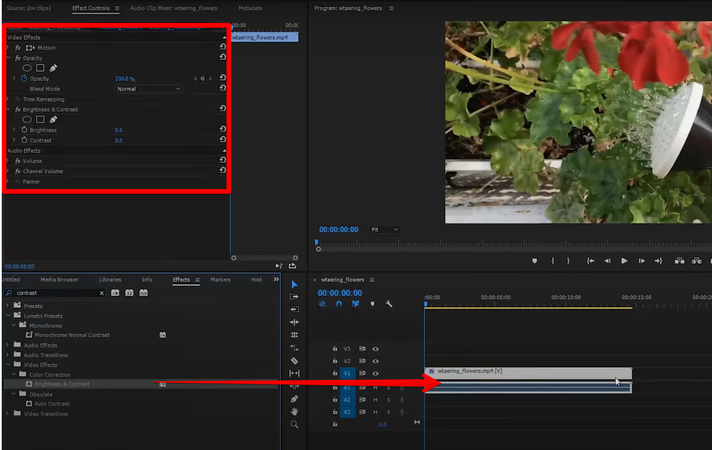
Step 3. Start Brightening Your Clip
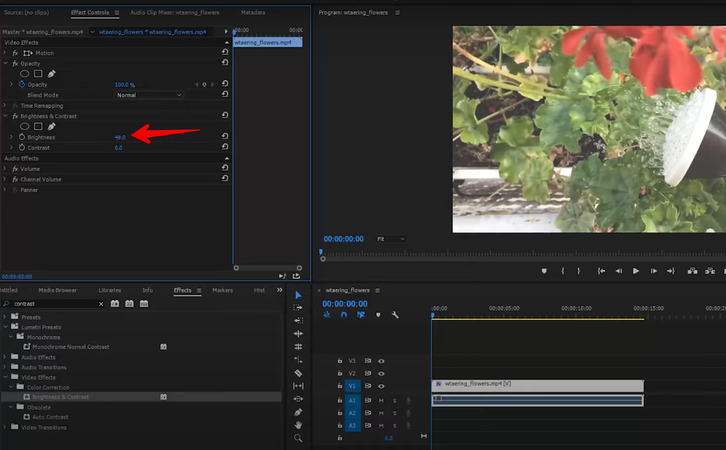
Here, in this left menu, you can play with the brightness and contrast settings to increase the brightness of your clip. Just add, for example, 20 in the 0.0 field to improve the visibility. You can also experiment with contrast to make the video look more sharper.
Part 2. 10 Best Tips for Brightening Videos in Premiere Pro
Brightening a video isn’t just about cranking up the exposure. Use these tips to improve the result of your edits in Premiere Pro:
1. Avoid Overexposure
While brightening your clips, make sure you don’t lose details in the highlights. Overexposed areas are hard to recover, especially in videos with clipped whites. Use the Scopes Panel (Window > Lumetri Scopes) to monitor your adjustments and keep highlights below 100 on the program monitor.
2. Use Adjustment Layers
Instead of applying changes directly to your clip, it’s better to use an adjustment layer in Premiere Pro. This non-destructive editing approach allows you to experiment with brightness settings and revert easily if needed.
3. Balance Brightness and Color
It’s possible that changing brightness and contrast affects color balance. After increasing exposure, check the white balance and saturation and use the White Balance Selector in the Lumetri Color panel to fix any shifts.
4. Use Premiere Pro Default Presets
Premiere Pro offers built-in Lumetri Color presets that can save time. For example, the Brighten or Cinematic presets are great starting points. You can then save your own settings as a preset for future use.
5. Combine Brightness with Sharpening
The brightened video can sometimes reduce perceived sharpness. After brightening, apply the Unsharp Mask effect (found under the Effects panel) to enhance edges and restore clarity.
6. Adjust for Scene-Specific Needs
Every video is unique; for example, a dark indoor scene may require different adjustments than an outdoor clip. So, we advise you to do the brightness adjustments based on the context and mood of the footage.
7. Use the HSL Secondary Tool
If a specific color or part of the footage needs brightening, the HSL Secondary feature in Lumetri Color can be of great help. This tool isolates specific colors for targeted adjustments to give you finer control over the brightness of certain areas.
8. Use Keyframes for Dynamic Brightness Changes
When lighting changes within a clip (e.g., moving from a dark room to a bright outdoor space), keyframes help you create seamless brightness transitions. Add keyframes in the Effects Control Panel for exposure or other brightness settings.
9. Calibrate Your Monitor
To ensure accurate brightness adjustments, try to edit on a properly calibrated monitor. An uncalibrated display may mislead you into making overly bright or dim adjustments.
10. Preview on Different Devices
Brightness levels can appear differently across devices, so before finalizing, it’s best to test your video on various screens, including phones, tablets, and TVs, for consistent quality.
Part 3. The Best Online Alternative to Premiere Pro for Brightening Videos
Installing Adobe Premiere Pro and going through the hassle of increasing brightness, contrast, and other supported settings might be a bit much for you. That’s where the HitPaw Online AI Video Enhancer comes into play and lets you increase the video brightness very quickly through your browser.
Here’s how you can do this:
Create Now!Step 1. Access HitPaw Online AI Video Enhancer Dashboard
First, open Chrome, Safari, or any other browser on your device, and navigate to the HitPaw Online AI Video Enhancer page. Next up, sign up for an account with your email credentials to access the HiPaw dashboard.
Step 2. Upload Dim or Dark Clip
When in the dashboard, click the “Choose Video” option, and then browse to the location where you’ve saved your clip. Click “Open” to import into the editor.
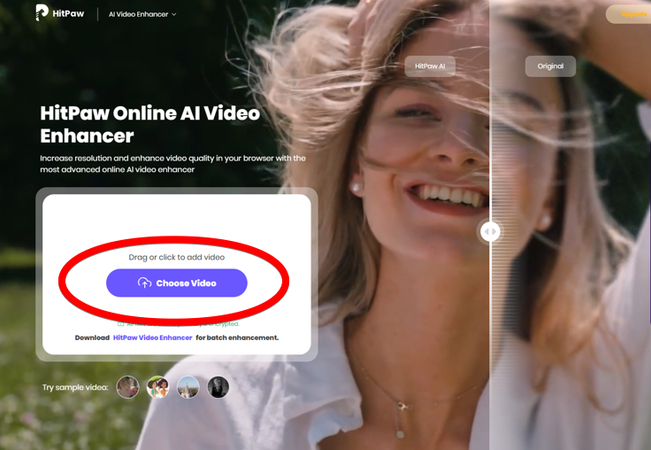
Step 3. Brighten Video & Save
Next, click the “Low-Light Video Enhancement” feature in the left menu and wait for a couple of minutes to let HitPaw Video Enhancer AI magic work. Afterward, preview the before and after results and then click “Download” to save the clip to your device.
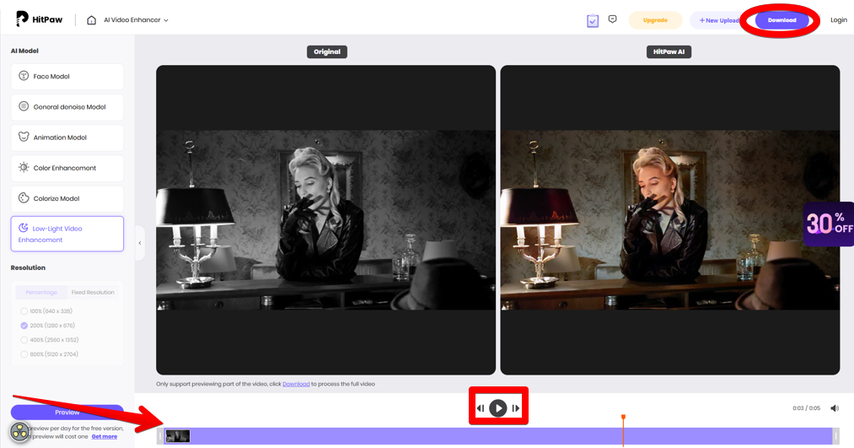
That’s quite easy, isn’t it?
Part 4. FAQs of Brightening Video in Premiere Pro
Q1. How do I make a video brighter in Premiere Pro?
A1. To brighten a video in Premiere Pro, go to "Effects" and search for "Brightness” or “Contrast." Drag any of these options onto your clip in the timeline. Next, open the Effect Controls panel, then adjust the Brightness slider to increase overall light levels and the Contrast slider to enhance details between light and dark areas. Monitor changes carefully to maintain a natural look and avoid overexposure or flat visuals.
Q2. How do I brighten a specific area in Premiere Pro?
A2. You can brighten a specific area in Premiere Pro by using the masking with the Lumetri Color effect. To do this, apply the effect to your clip, then in the Effect Controls panel, create a mask using the Ellipse or Rectangle Mask Tool. Position the mask over the desired area and adjust Exposure, Shadows, or Highlights in the Lumetri Color panel. Feather the mask edges for a smooth transition and use keyframes to animate the mask if the subject moves. This technique provides precise, localized brightness adjustments.
Q3. How to fix overexposed video in Premiere?
A3. To fix an overexposed video in Premiere Pro, use the Lumetri Color panel. Lower the Highlights slider to recover details in bright areas and reduce the Exposure for overall brightness control. Adjust the Whites slider to tone down overexposed white levels. If needed, use the Curves tool to fine-tune specific tonal ranges. To avoid making the video look flat, increase the Contrast slightly to enhance depth. Always use Lumetri Scopes to monitor changes and maintain proper balance.
Q4. What is the best alternative to Premiere Pro?
A4. Premiere Pro is probably one of the best software for Windows and Mac users to brighten videos. However, if you want to save time and are looking for AI-powered video enhancement, HitPaw Online AI Video Enhancer is a great choice. It offers one simple “Low-Light Video Enhancement” feature to improve video quality and eliminate the learning curve of traditional editing platforms.
Conclusion on Brightening Video in Premiere Pro
Mastering how to brighten video in Premiere Pro can change your dark footage into stunning, vibrant visuals with just a few tweaks. Instead of complicated designing, this tool gives you quick access to brightness and contrast settings that enhance your videos without complications.
However, if you’re short on time or looking for a simpler solution, the HitPaw Online AI Video Enhancer is a fantastic alternative. Its AI-powered technology makes brightening videos quick and effortless. Try it now and improve the quality of all your dark clips within minutes!



Home > Learn > Dark Videos Ruining Your Shots? Here's How to Brighten Video in Premiere Pro!
Select the product rating:
Natalie Carter
Editor-in-Chief
My goal is to make technology feel less intimidating and more empowering. I believe digital creativity should be accessible to everyone, and I'm passionate about turning complex tools into clear, actionable guidance.
View all ArticlesLeave a Comment
Create your review for HitPaw articles