Davinci Resolve Brighten Video: The Only Guide You Need!
DaVinci Resolve video editing software is very popular amongst newbies and professionals alike. Whether you're working on a cinematic masterpiece or a casual vlog, DaVinci Resolve brighten video with ease using its color grading features. This guide will show you how to do it step by step without overwhelming you with technical jargon.
Part 1. Why Brightness Matters in Videos?
Brightness is a very important factor in establishing how your video is perceived by the viewers. Too dark, and your audience might miss details. Too bright, and the video could appear washed out. Therefore, striking the right balance makes sure your visual content is inspiring and professional-looking at the same time. That’s where DaVinci Resolve comes into play and offers excellent tools to adjust brightness effectively to help you get the best possible outcome within minutes.
Part 2. Brighten Video Davinci Resolve Tutorial with Step-By-Step Instructions
Davinci Resolve brighten video process is quite simple, but you need to understand the different features and export methods to make ends meet. Let’s explore the steps.
Step 1. Download and Open DaVinci Resolve Software
Install and then launch the DaVinci Resolve software on your PC and create a new project. If you're opening an existing project, be sure to save your progress before making changes.
Step 2. Import Your Video
Then, navigate to the “Media Pool” section to drag & drop the clip or use the "Import Media" option. Once imported, drag your footage onto the timeline.
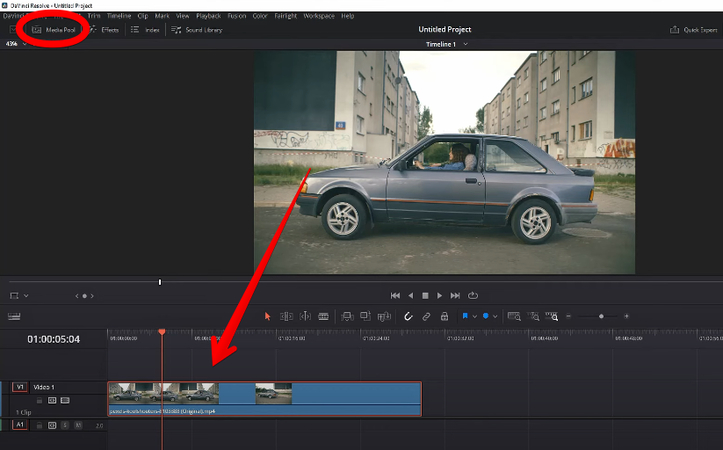
With your video loaded, you're ready to enhance its brightness.
Step 3. Accessing the Color Page
The Color page in DaVinci Resolve is where the magic happens. This section might seem intimidating at first, but you’ll only need a few tools to brighten your video effectively.
To go to the Color page, click on the Color tab at the bottom of the interface. Here, you'll see a variety of tools, such as color wheels, curves, and scopes.
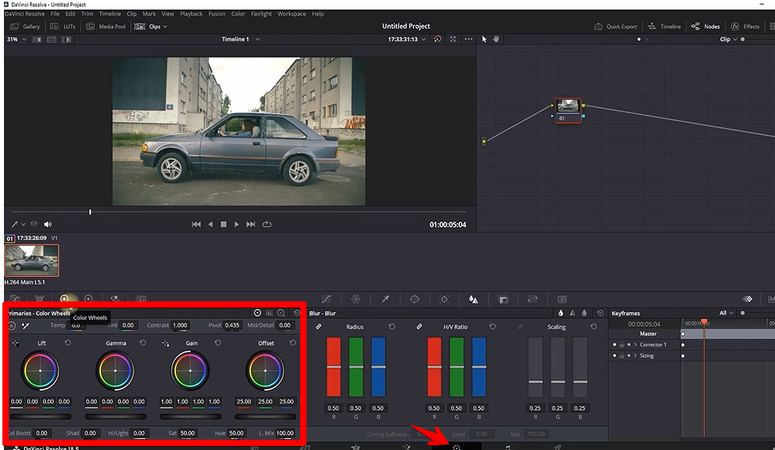
Step 4. Adjusting Brightness Using Primary Wheels
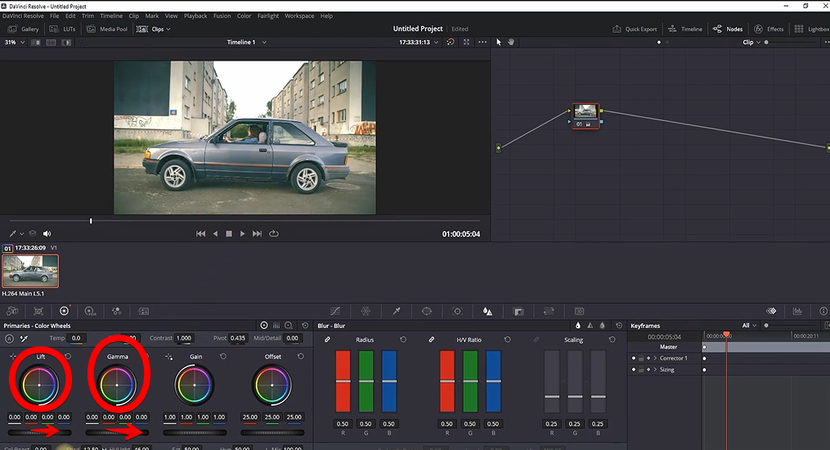
The Primary Wheels are your go-to tools for adjusting brightness in DaVinci Resolve. They allow you to control different aspects of your video's exposure. However, if you are just concerned with the video brightness, locate the Primary Wheels panel on the bottom-left of the Color page and move the “Lift” wheel to the right. If you want a bit more brightness, move the “Gamma” wheel to the right until you are satisfied with the result displayed in the timeline above.
Step 5. Finalizing Your Adjustments
Once you're satisfied with your brightness adjustments, it’s time to review and export your work. For this, play the video from the start and check for overexposed or underexposed areas.
If needed, go back and fine-tune the adjustments. It’s better to spend a little extra time making sure everything looks perfect.
Step 6. Enhancing the Video Brightness with Contrast and Saturation In DaVinci Resolve
After brightening your video, you might notice it looks a bit flat or unnatural. To fix this, adding contrast and saturation can restore the balance that results in a visually appealing video.
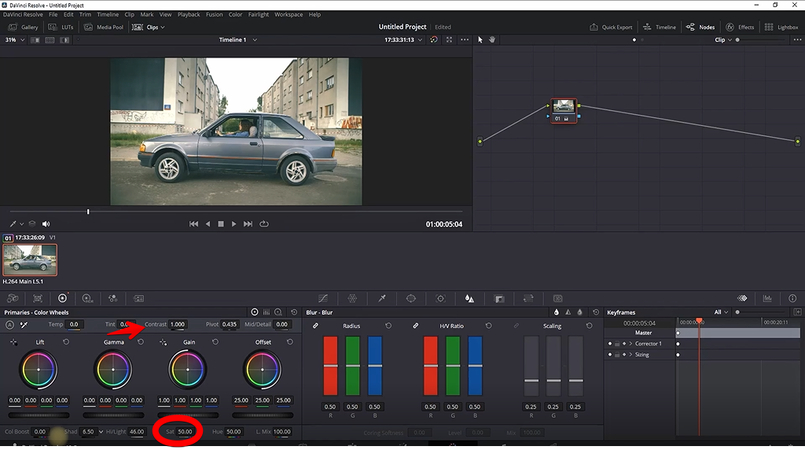
To do this, locate the “Contrast” option at the top of the wheels on the Color page and increase its value slightly to make the darks darker and the lights brighter. However, avoid going too high, as excessive contrast can make your video harsh.
Then, increase the value in “Saturation” below the 4 wheels to add more color intensity. Small adjustments here can make your video pop without oversaturating.
Step 7. Exporting Brightened Video In Davinci Resolve
Lastly, it’s time to export your brightened video. To do this, set the in and out points of the clip and click “Deliver” at the bottom, which will bring up a custom export menu.

Next, set the following fields.
1. Name the file.
2. Choose the location where you want to save the brightened video.
3. Select “Single Clip” and “Video.”
4. Check the “Export Video” option.
5. Select “MP4” next to “Format.” If you want to export the default Davinci Resolve format, select “QuickTime.”
6. Select “H.264” in “Codec.
7. Next, make choices like resolution, frame rate, and video quality.
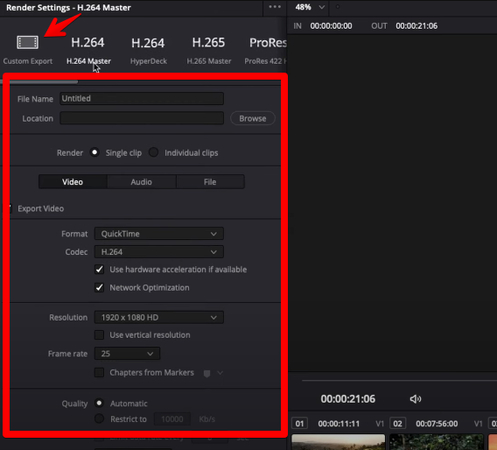
8. Finally, click “Add to Render Queue” and select “Render All” to export your brightened video in your desired format.
Part 3. Online Alternative to iMovie for Windows - HitPaw Online AI Video Enhancer
DaVinci Resolve is free software for Windows, Mac, and Linux systems, and a few of its advanced features are locked behind a subscription. It can be tiring for you to go through the hassle of downloading, installing, and then learning it for a task as simple as brightening a video.
There’s an alternate way to brighten your dark videos that doesn’t require you to download any software and still get the best result. The HitPaw Online AI Video Enhancer works great on any browser and can replace your dim or dark videos with newfound brightness. You’ll be done with the whole process before you are halfway through sipping your cup of coffee. If you only know how to click with a mouse or tap with your finger on your device, you can do this:
Let’s explore the steps below:
Create Now!Step 1. Open HitPaw Online AI Video Enhancer Webpage
In this step, open a browser (Chrome or any other choice) on your device and open the HitPaw Online AI Video Enhancer webpage. Now, make a new account with your email credentials to access the online dashboard.
Step 2. Upload the Video to Brighten
The next step is to click or tap the “Choose Video” option and then browse to the location where you’ve saved the dark video on your device. Next, click “Open” to import the specific video to the HitPaw Online AI Video Enhancer.

Step 3. Brighten Up Dark Video & Export
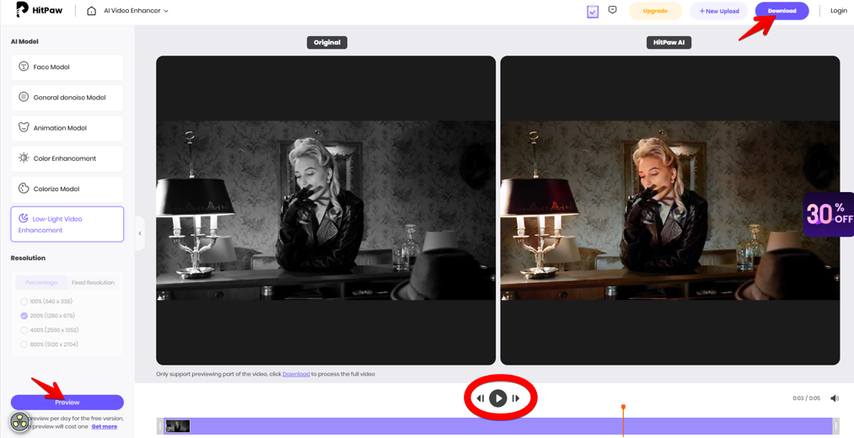
In the final step, go to the left menu and select the “Low-Light Video Enhancement” option. Now, wait for a couple of minutes to let HitPaw’s AI transform the dull and dark video into a brightened masterpiece.
You can click the “Play” button below the original and new video windows to preview the changes, and if you are satisfied with the results, click “Download” to save the brightened and enhanced video on your device.
Part 4. FAQs of Davinci Resolve Brighten Video
Q1. Can DaVinci Resolve Brighten video?
A1. Absolutely! DaVinci Resolve is fantastic for brightening videos. It offers powerful tools like Primary Wheels (Lift, Gamma, Gain, Offset) and Curves to adjust brightness precisely. Whether your video is too dark or just needs a slight lift, you can tweak shadows, midtones, and highlights for a perfect balance. Plus, you can use tools like Qualifiers to brighten specific areas without affecting the whole scene. With a bit of practice, you’ll create bright, vibrant videos that look professional and visually stunning!
Q2. How to make video brighter in DaVinci Resolve?
A2. Making a video brighter in DaVinci Resolve is super easy! First, head to the Color page. Use the Primary Wheels to adjust brightness: move the “Lift” and “Gamma” wheels to the right. Also, increase the contrast and saturation values to sharpen the brightened effects further. Once you're happy, preview your changes and export the video in the default format or MP4.
Q3. How to fix overexposure in DaVinci Resolve?
A3. To fix overexposure in DaVinci Resolve, jump to the Color page and use the Primary Wheels to adjust highlights and shadows. Lower the Gain to reduce overly bright areas, and tweak the Gamma to balance the midtones. If the shadows need depth, slightly decrease the Lift. For precision, try the Curves tool to target specific brightness ranges or use a Qualifier to isolate and adjust overexposed sections. With these tweaks, you can bring back detail and create a balanced, professional look!
Q4. What is the best online alternative to DaVinci Resolve?
A4. If you're looking for a great online alternative to DaVinci Resolve, HitPaw Online AI Video Enhancer is an excellent choice! It’s simple, fast, and doesn’t require downloads. Powered by AI, it enhances your videos automatically, improving brightness, sharpness, and overall quality with minimal effort. Whether you're fixing lighting issues or upscaling resolution, HitPaw does the heavy lifting for you. It’s perfect for those who want professional results without diving into complex software. Just upload your video, tweak settings, and enjoy impressive results!
Conclusion on Brighten Video Davinci Resolve
DaVinci Resolve brighten video with its Color wheels by enhancing highlights, balancing shadows, or fine-tuning mid-tones. The tool offers everything you need to make your video shine. But if you're looking for an even faster and more beginner-friendly option, try HitPaw Online AI Video Enhancer. It’s an effortless way to brighten, sharpen, and enhance your videos online. Give it a try today and see your videos transform in minutes!






Home > Learn > Davinci Resolve Brighten Video: The Only Guide You Need!
Select the product rating:
Natalie Carter
Editor-in-Chief
My goal is to make technology feel less intimidating and more empowering. I believe digital creativity should be accessible to everyone, and I'm passionate about turning complex tools into clear, actionable guidance.
View all ArticlesLeave a Comment
Create your review for HitPaw articles