Master Davinci Resolve Color Grading Complete Guide
Color grading is a transformative process of improving video quality by using colors, contrast, and brightness to achieve the intended look. By 2026, Davinci Resolve will remain one of the top professional color grading tools, with rich features and precision. This tutorial will explain everything from the basics to professional-level techniques, ensuring you fully utilize Davinci Resolve color grading to enhance your projects. We'll also explore how HitPaw AI Photo Enhancer can play a key role in mastering visual content creation.
Part 1: What is Color Grading in Davinci Resolve?
Color grading is modifying the image's color to convey a specific mood, tone, and feeling. This process makes the video stylish and the editor highlighting the particular elements and tones becomes a clue to what the audience feels depending on the scene. Color grading highlights and adjusts the color palette of already captured images. In passionate and angry scenes, red and contrast are strengthened through color grading in DaVinci Resolve, visually highlighting the character's emotions. In addition, a gentle scene can underline gray or pastel color and give the image a soft edge.
Importance of Color Grading in Video Production
- Visual Storytelling: To createa mood and feeling in the video, visuals are linked with the storyline, producing an engaging appeal among the viewers.
- Professionalism: Rich color grading enhances the production quality by giving the content a polished look that makes itcatchy to the viewer's eyes.
- Consistency: Provides a unified visual look in each scenewhich enhances the clarity of
- Mood Enhancement: Allows the creator to create a particular mood by balancing color tints and saturation levels.
- Brand Identity: Using a consistent color palette in your design helps to maintain the brand's style or theme, which builds recognition.
Part 2: How to Get Started with Color Grading in Davinci Resolve
This section will review a basic color grading workflow in DaVinci Resolve, highlighting essential tools. Try to match the colors and style to the look of your favorite movie as you follow along. If needed, refer to our guide on color grading DaVinci Resolve basics.
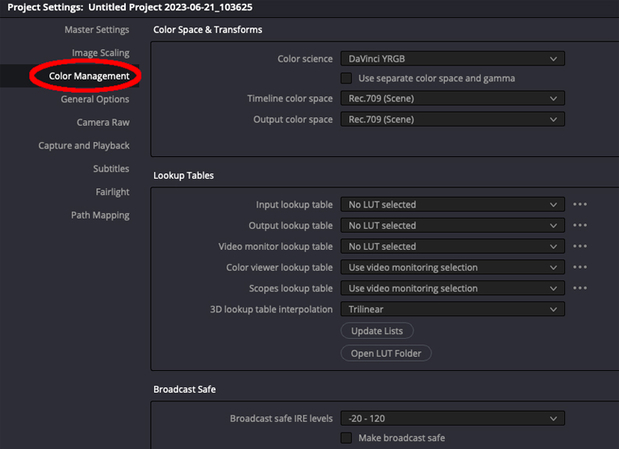
Step 1: Set Color Space SettingsStart by setting your color space to Rec.709 for consistent color, contrast, and gamma. This standard simplifies grading, especially for log or flat footage. Go to File > Project Settings > Color Management tab, select DaVinci YRGB Color Managed, and choose SDR Rec.709 for the output color space.

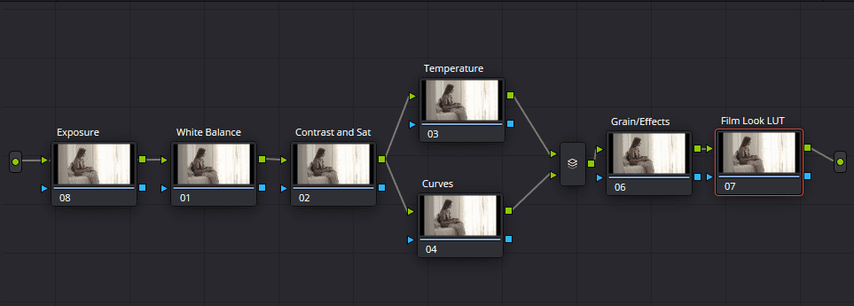
Step 2: Create a Basic Node Tree
DaVinci's node system organizes your grading process. Use a basic node structure to start with color correction and then fine-tune looks with contrast, saturation, and curves. Press Nodes (top-right) and use Alt + S to add serial nodes and Alt + P for parallel nodes.
Step 3: Add a LUT (Optional)
For a finishing LUT (like film emulation), add it before grading so adjustments are applied beneath it. Right-click the Film LUT node, choose LUTs, and select your preferred LUT.
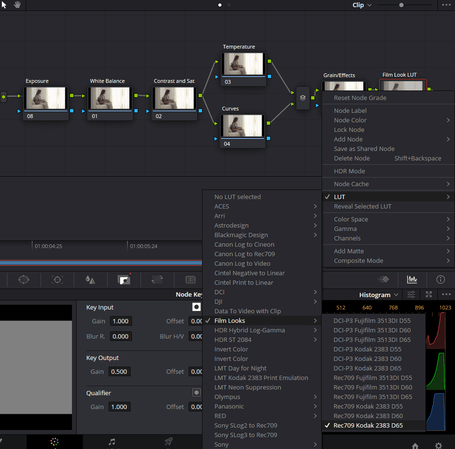
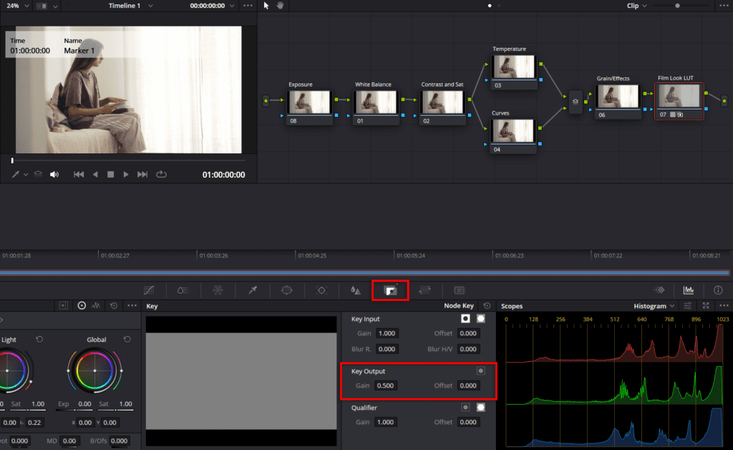
If it's too strong, adjust it in the Key tab using Key Output.
Step 4: Set Exposure
Adjust your exposure for correct brightness in DaVinci Resolve color grading. Open the Primaries - Color Wheels and use the Exposure sliders below each wheel to fine-tune the image. Keep an eye on the histogram to avoid clipping highlights or shadows.
Step 5: Correct White Balance
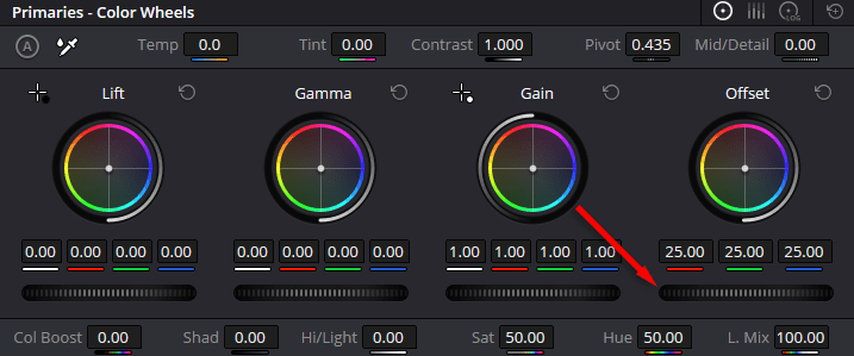
Use Balance node and Offset wheel in Primaries - Color Wheels to correct white balance. Shift the wheel to remove unwanted tints (e.g., pink to green) for natural skin tones.
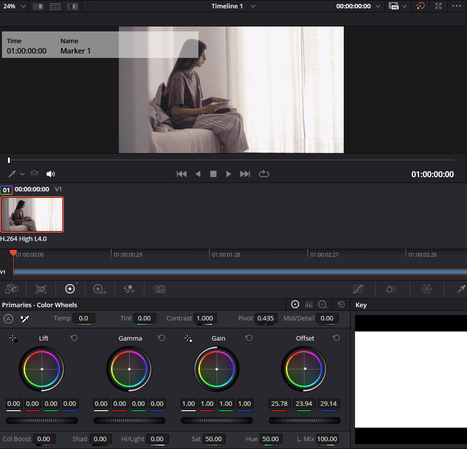
Step 6: Add Contrast & Saturation
Increase contrast and saturation using Primaries - Color Wheels. For targeted adjustments, use Hue vs. Saturation curves to enhance specific colors, such as boosting blue saturation.
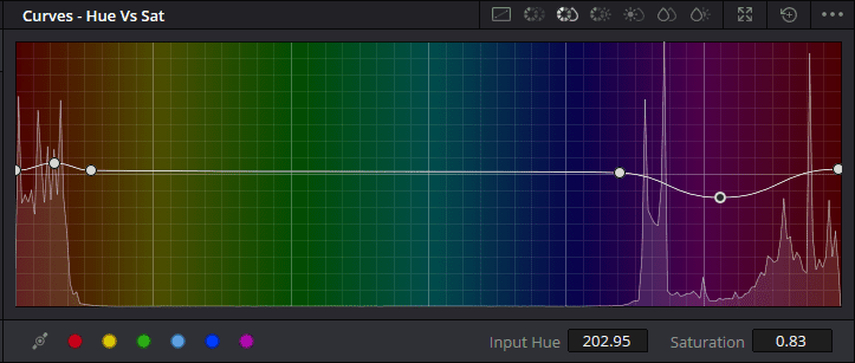
Step 7: Fine-Tune the Look
Now, refine your grading to achieve the desired styles. Here are a few techniques:
Teal and Orange: Push shadows towards teal and mid-tones to orange for a cinematic contrast.
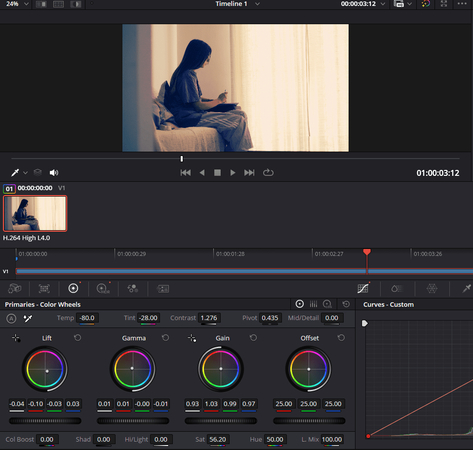
Bleach Bypass: Lower saturation and increase contrast for a rough, desaturated look.
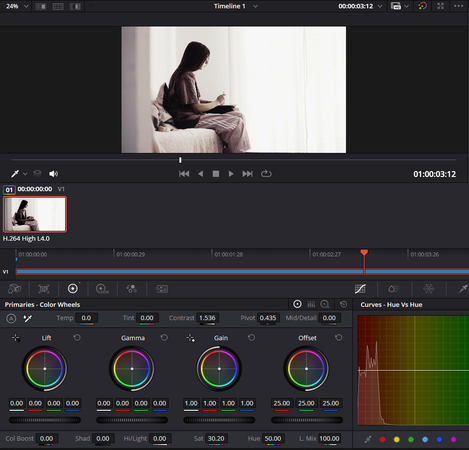
Vintage Look: Add a warm yellow/orange tint with reduced contrast. Finish with a vignette effect.
Part 3: Advanced Color Grading Techniques in DaVinci Resolve
Color grading is an art that helps set the tone, mood, and emotional feel of your video. Without it, you wouldn't be able to shape these aspects effectively. Advanced color grading with DaVinci Resolve offers endless possibilities; this section will guide you through mastering color wheels, curves, and LUTs to achieve perfect results. It will help you to achieve consistent color across multiple clips or create cinematic looks.
Using Color Wheels for Precise Adjustments
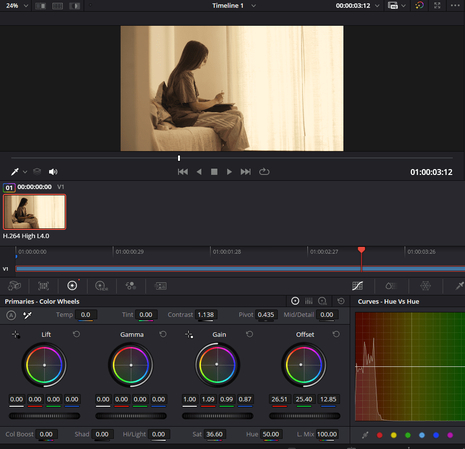
DaVinci Resolve color wheels are essential for achieving precise control over shadows, mid-tones, and highlights. Lift controls the shadows, Gamma manipulates midtones, and Gain enhances the highlights. Offset helps to balance the overall color of the entire image. Be sure that your corrections don't push the exposure of your shot to an inappropriate limit. Scopes like Waveform Monitor can prove useful. Making small adjustments to gain and tweaking the Gamma can improve detail without causing color clipping.
Mastering Curves for Tonal Control
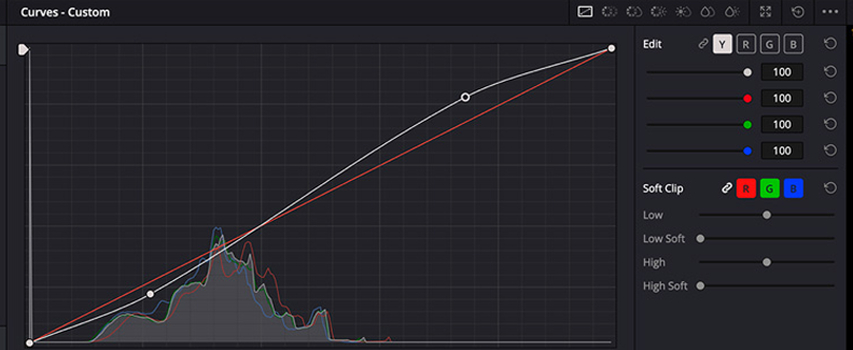
Curves offer even more flexibility to control specific tonal ranges with incredible precision. Custom curves allow you to adjust individual RGB channels or create a dramatic contrast by forming an "S-curve." Hue vs. Hue adjustments are perfect for modifying specific colors, such as turning dull greens into vibrant shades. In comparison, Hue vs. Luminance adjustments can darken or brighten specific hues for stylized effects. Using the Eyedropper tool in color grading in DaVinci Resolve helps target particular colors in the image, ensuring precision.
Using LUTs to Streamline Your Workflow
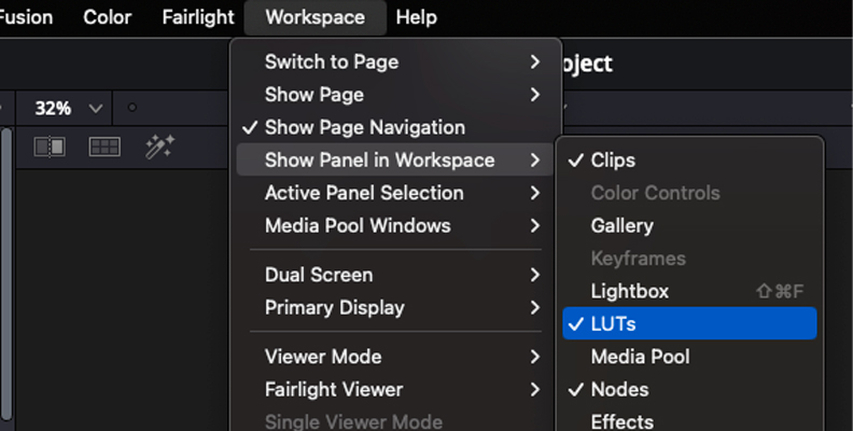
One of the important tools to facilitate your workflow with ease is using LUTs or pre-configured color grading profiles. Your footage can look completely transformed through a few simple clicks. One uses technical LUTs that guarantee color space accuracy and save your time on this aspect, as well as the creative use of LUTs for achieving an artistic vision. For effective use of LUTs, they are applied in the "Color" tab, and their strength is controlled using the Key Output Gain slider. LUTs with manual control hit the spot of automation with customization.
Creating Cinematic Looks and Mood
This is a process of cinematic looks and moods, starting from a good base grade that will correct white balance, exposure, and contrast to get the image as neutral as possible. At this point, contrast and saturation can be fine-tuned for depth and emotion. High contrast enhances the shadows and highlights, while color grading in DaVinci Resolve allows for precise saturation adjustments, creating a mood that can range from muted and moody to bright and uplifting.

Part 4: Bonus Tip: Enhance Your Pics with HitPaw AI Photo Enhancer Online
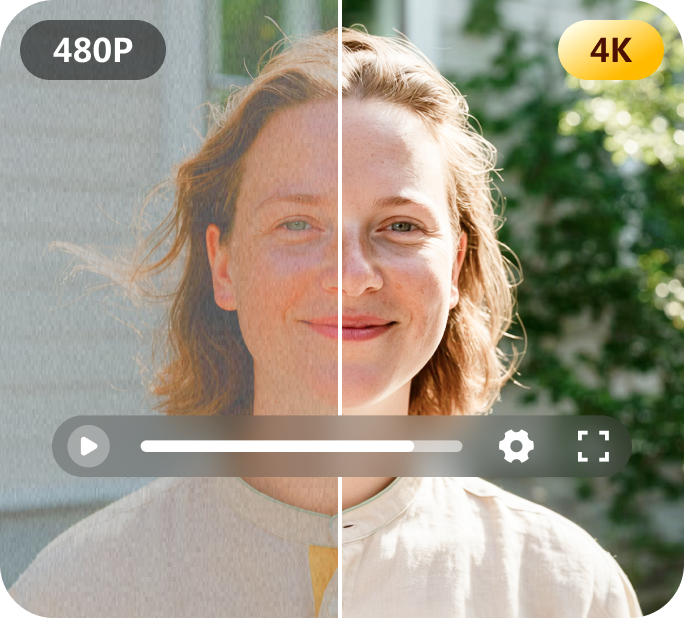
HitPaw Online Photo Enhancer is a powerful and friendly tool that makes your images look better in a snap. This applies to video stills and individual pictures, which promise sharpness, bright colors, and professional-grade photos. It uses advanced AI algorithms to restore detail and up-scale resolution while reducing noise impressively. In addition, it can also do black and white photos color, repair old photos. This tool is perfect for content creators because the images are sure to be of the highest quality and can be appropriate for any given platform. HitPaw makes it easy and delivers excellent results with a few clicks, regardless of your skill level.
Key Features of HitPaw AI Photo Enhancer
- AI-Powered Enhancement: It automatically enhances image sharpness and restores details to give it a polished look.
- Noise Reduction: It removes unwanted noise while maintaining the quality of the image.
- Resolution Upscaling: Enhances resolution without pixelation, making images clearer and more detailed.
- Batch Processing: Multiple images can be enhanced simultaneously bysaving time and effort.
- Web-Based Convenience: It is accessible online;hence, there is no need for software installation.
Steps to Use HitPaw Online Photo Enhancer
Step 1:Open HitPaw AI Photo Enhancer, click "Choose Image," and select or drag your image to upload.

Step 2:HitPaw AI enhancer will automatically enhance your image quality. It may take a few seconds.

Step 3:Compare the before and after to check improvements in sharpness and quality.

Step 4:Click "Download" to save the enhanced image to your device.

FAQs About Davinci Resolve Color Grading
Q1. How does color grading impact the overall look of a video?
A1. Color grading is a process that makes a video visually appealing by setting the mood, tone, and style. It ensures the visuals align with the story, making the video more immersive.
Q2. What makes Davinci Resolve different from other video editing software for color grading?
A2. Davinci Resolve is unique, starting with its tools being on normal with the industry standard, its color grading workspace, and its plethora of functions ranging from HDR grading to Fusion effects and high-quality LUTs. The free version provides professional-grade tools.
Q3. How can HitPaw Online Photo Enhancer improve the quality of video stills?
A3. HitPaw Online Photo Enhancer utilizes AI to enhance the resolution and sharpness of video stills for thumbnails, posters, or other promotional materials.
Conclusion
Mastering color grading in Davinci Resolve will make everything an endless possibility when making great videos. The above gives you just what you may need in that video project going into 2026-from masters of the fundamental basics up through applying advanced techniques. You may even improve this further by using tools that carry the HitPaw Online Photo Enhancer's capabilities, that each frame details an image. Hence, go forward today and start doing experiments. To help you, include every part within your creative mind to shine according to its highest potential.
Try It Now!




Home > Learn > Master Davinci Resolve Color Grading Complete Guide
Select the product rating:
Natalie Carter
Editor-in-Chief
My goal is to make technology feel less intimidating and more empowering. I believe digital creativity should be accessible to everyone, and I'm passionate about turning complex tools into clear, actionable guidance.
View all ArticlesLeave a Comment
Create your review for HitPaw articles