How to Create Photos with Double Exposure in Photoshop
Photographers and artists are always on the lookout for new and interesting techniques to express their love for art and create thoughtful pieces. Double exposure is one such technique that dates back to the 19th century. Today, technological advancements have made it possible for you to create this effect with photo editing software as well.
In this article, we will look at how you can create a photo with double exposure in Photoshop. Let's get on with it.
Enhance Now!Part 1. What Is Double Exposure In Photography?
Double exposure is a technique in which you can combine or layer two photographs on top of each other to create a single image.
Think of it as a photo having a man silhouette filled with a starry night, sounds aesthetic, right? This is what this technique does. The fact that this old technique was born out of a mistake makes it even more interesting.
In the old days, when people used to shoot using film cameras, sometimes they would accidentally shoot over a piece of film that already had a picture on it, and they would not know until they got their films developed. This is how these amazing photos came into existence.
Later on, photographers of that time made it a means to earn by creating double exposure photographs. They've done so by having a single person pictured in different poses in a single picture. Undoubtedly, that's a wild thing for people at that time.
Now, editing software like Adobe Photoshop has made it much easier for the newbie to convert their boring captured pictures into interesting masterpieces using this technique.
Part 2. How to Do Double Exposure in Photoshop In 4 Steps
Adobe Photoshop provides tools that you can use to create these aesthetically pleasing photos.
The best part? You can do this quickly in just 4 easy steps, and if you follow them correctly, this can result in your desired effect. You might need some practice to get familiar with the steps, and after that, there's a world of endless possibilities to experiment with your own logic.
The number of steps may vary depending on the complexity of the double exposure photos you want to create. But if you are not a professional graphic designer or photographer and still want to create these photos, you can follow these simple steps.
Step 1. Choose Two Photos
First things first, you should choose the right photos to get the best results.
As a rule of thumb, a high-contrast portrait or silhouette image with a clean background and a single neutral color is preferred as the base image.
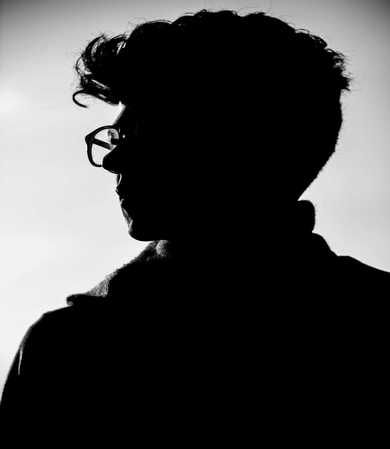
You really need to pay attention to the details of your base image. It must not have a crowded background, otherwise it will mess up with the second image, and the double exposure photo will lose its charm.
The second image or the foreground usually consists of patterns like trees, branches, etc, textures, a landscape or nightscape, which, when overlaid on the simple base image, creates amazing results.
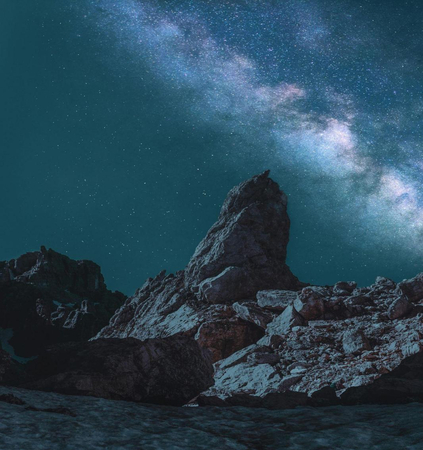
The idea here is that the second image, having the patterns or texture, fills the dark space (like the black silhouette) of the base image and creates a surreal photo.
When working with face portraits, one important tip is to make sure that the area of the second image that overlaps with the portrait's face must be darker, so when you use the Screen Blend Mode, the light areas of the second image will show through, and the face will be visible in the darker area.
Step 2. Install Adobe Photoshop
To create an image with double exposure in Photoshop, install it on your Windows or macOS device. To do this, simply head to the Adobe Photoshop site and download the version according to your OS.

Step 3. Import and Adjust Photos
After downloading and installing, launch the app. The Photoshop Home screen will open up. To use your images, you have to first import the photos. To do this, click the "Open" option located on the right sidebar of the Home screen.
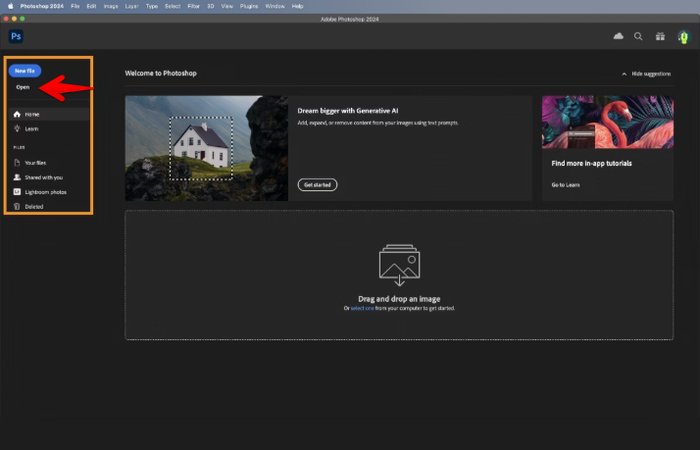
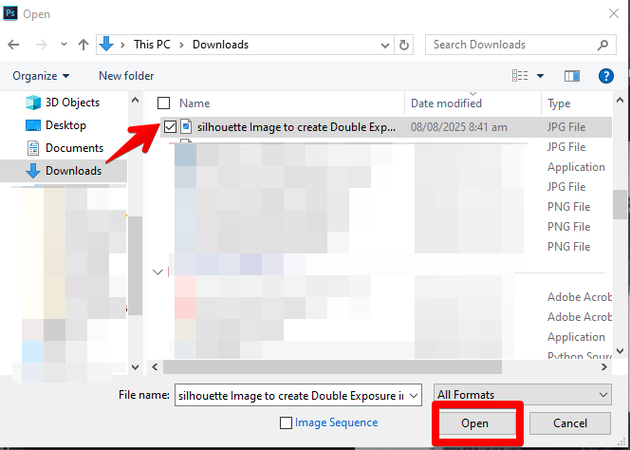
An "Open" dialog box will pop up. Here, you have to select your base photo and click the "Open" button to import it.
To upload the second picture, you can use the drag-and-drop method. For this, press Windows Key + E to open the File Explorer (Windows) or Command-N to open the "Finder" window on macOS. Make sure to resize the File Explorer or Finder window to perform the next steps.
Now, you have to go to the location of the second image and place your cursor on the image. Drag the image file onto the Photoshop canvas by dragging the mouse and then release the mouse button to place the image on the canvas.
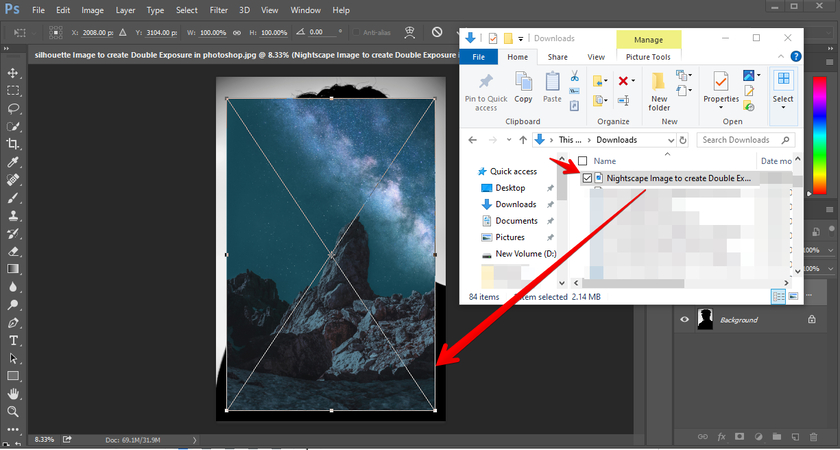
In the layers panel on the left sidebar, you can see that the base photo now appears below the second photo. Let's assume the second photo name is the Layer photo to understand the next steps in a better way.
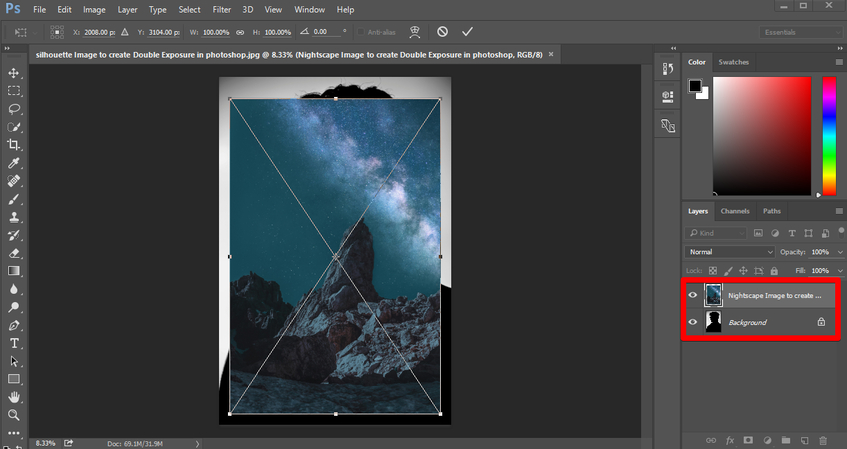
Next, you have to adjust the layer photo above the base photo so that when you apply the Screen Blending mode to it, it fits well. For this, select the layer photo by clicking it and then press Ctrl + T (Windows) or Command + T (Mac) to activate the Transform feature in Photoshop.
Next, you have to place the cursor at one of the corner handles of the layer photo; it will turn into a double-sided arrow. Now, to enlarge or shrink the layer photo, you can drag the handle outwards or inwards, respectively, using your mouse.
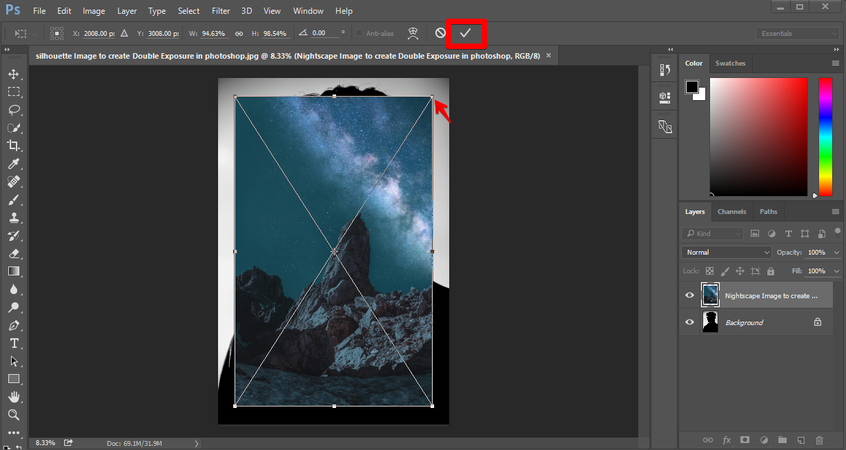
Alternatively, you can also adjust the layer photo using the options on the top bar, which appears when you activate the Transform feature.
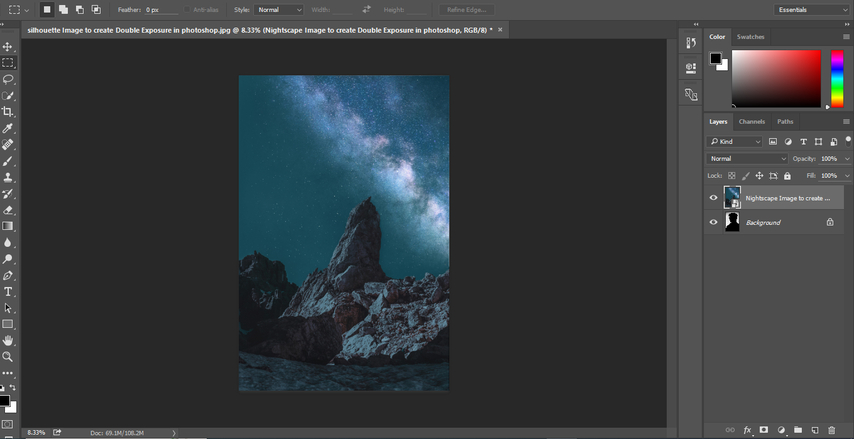
At the top bar, you can see the Height and Width sections denoted by "H" and "W" respectively. Place the cursor on either H or W and drag it to scale this image up so that it completely covers the base photo. You may need to use both the "Height" and "Width" options to adjust the layer photo properly.
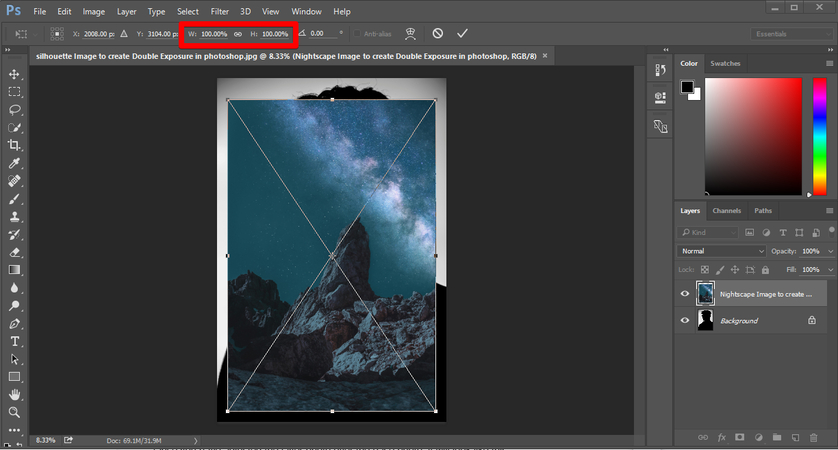
Once you have adjusted the layer photo over the base photo, it will look like this.
Step 4. Adjust the Blending Mode
Traditionally, the double exposure shot on a camera's film takes the light information for each of the images and then puts them on top of each other.
This light information, basically, controls the results, which is why it is recommended to use high-contrast photos with visible dark and bright areas, especially when creating a double exposure in Photoshop.
In Photoshop, there is a Screen Blend mode you can use to take the light information. To do this, first, select the top layer in the layer panel. Then, change the default Blend Mode from "Normal" to "Screen".
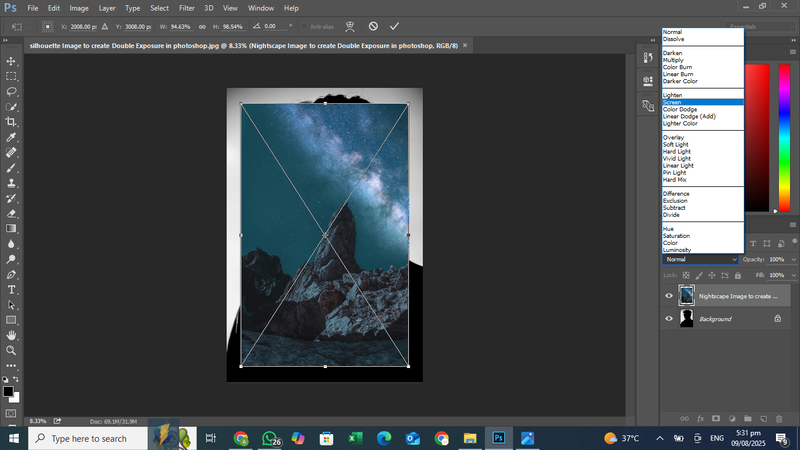
And Congratulations! This will merge both the photos beautifully and create a double exposure in Photoshop. To get rid of the grid lines, you have to click the "Tick" symbol in the top bar. This ia an initial this is not the final image, and you can do much more to adjust the final photo according to your liking.
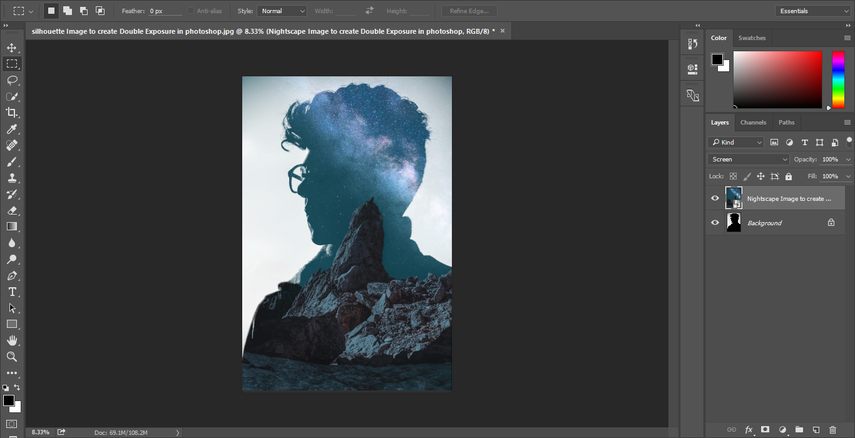
Step 5. Do More with Your Double Exposure Photo
You can experiment with this initial double exposure photo using different editing options to get the best results. Here are the three ways you can do this.
To get a different effect than the initial photo, again use the Transform tool by pressing the shortcut key mentioned earlier. Set your point at some point on the layer image and click and drag the cursor on "H" or "W" options in the top bar to scale the image as large or as small according to your requirement.
Secondly, you can use different Blending modes, e.g, "Screen", "Lighten", or "Multiply" to test which one works better for you.
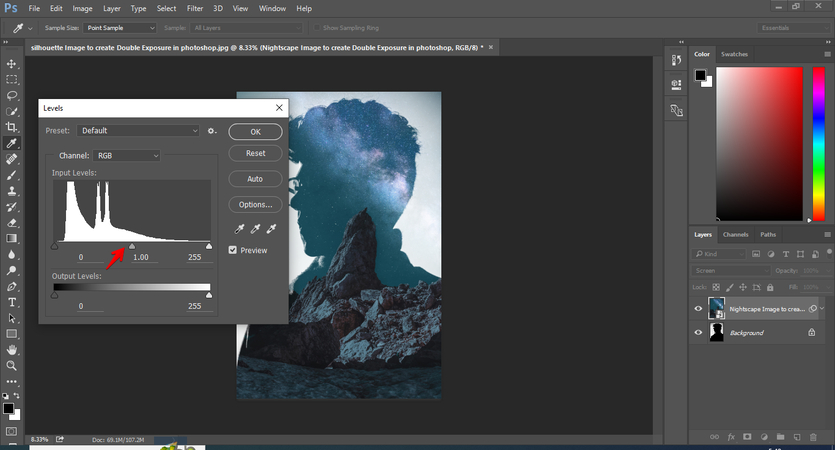
Next, you can adjust the brightness and make the photo lighter or darker by activating the "Level Adjustment" tool and sliding its bar to the left or right. The shortcut key for this tool is Ctrl + T (Windows) or Command + T (Mac).
Part 3. How to Make a Double Exposure Without Photoshop?
While it's a reality that the double exposure technique was discovered accidentally in film cameras, this feature is now purposely featured in many modern DSLR cameras, like Nikon, Canon, etc.
People who want to do practical things instead of hitting the computer buttons for every task, and of course have a camera, will love this method of creating double exposure photographs.
The camera settings can vary, and it depends on which camera you own. The best way is to read the product manual to get an idea about the exact steps to use this feature on your camera.
First of all, double-check that your camera is in photo mode and not in video mode so that things move smoothly when you turn on the double exposure feature.
Now, if your camera has this feature, you might see a "Multiple exposure" option in the main menu. Multiple exposures usually use more than 2 exposures, but the camera gives the option to choose the number of exposures between 2 and 9. You can search through your camera's main menu, and if it has the feature, you will definitely find it.
Once you find the settings, just turn on the Multiple exposure feature, which is set to off by default. There will be other feature-related options as well; some of them can be left as the default, or you can also play with them.
Part 4. How to Make a Double Exposure Effect In Canon EOS R5
If you have a Canon EOS R5, follow these steps for the double exposure effect in your captured pictures:
Step 1. Find the Right Setting
- First, switch on your camera and press the Menu button, which is located at the back of your camera, to open the menu panel.
- To scroll down to an option, use the dial on your camera and press the "SET" button to select a particular option.
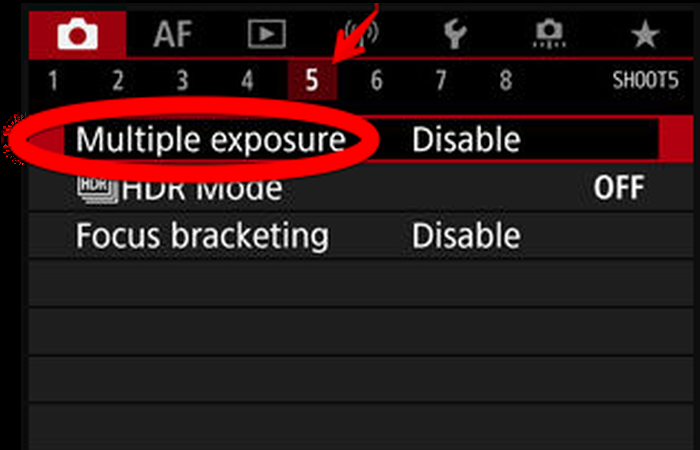
On the screen, go to the 5th page using the top panel. On this page, you will see the "Multiple exposure" option. Select it by clicking the "SET" button.

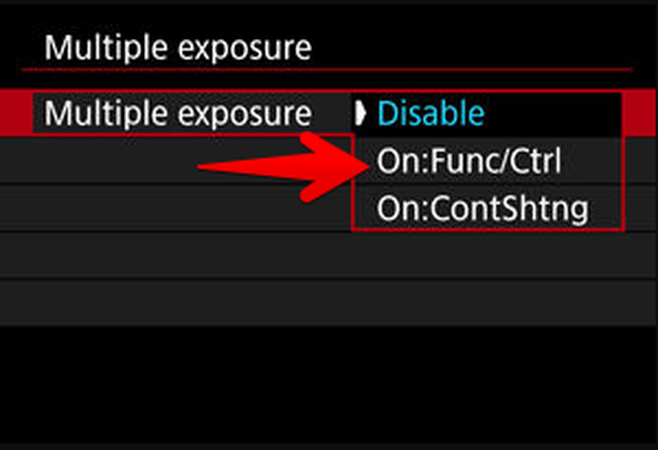
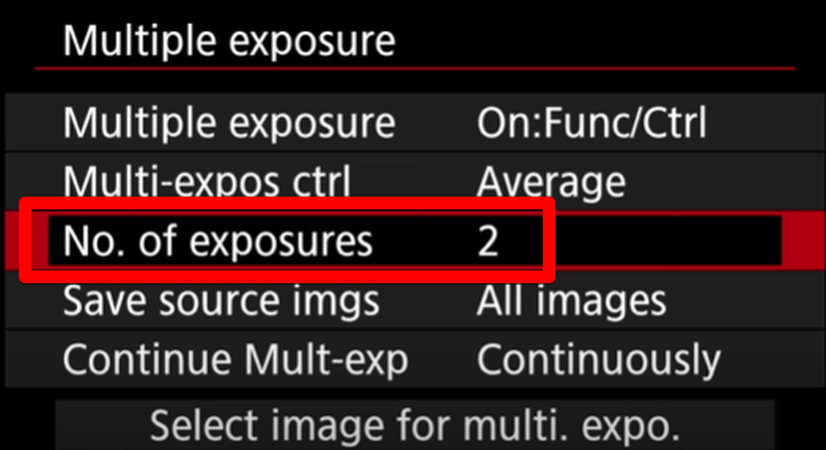
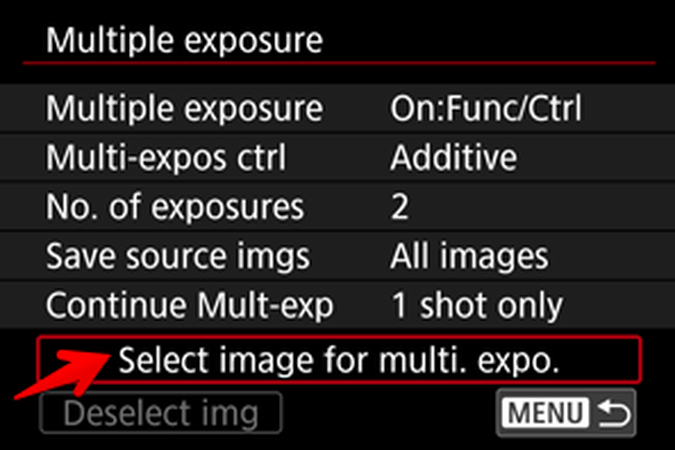
Next, turn the dial to scroll down to the second option, " On:Func/Ctrl," and then press the "SET" button to turn on the feature.

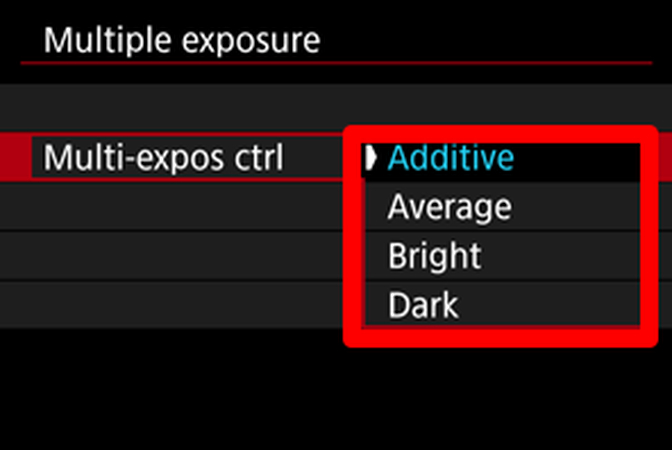
You will see other options as well, such as "Multi-expos ctrl"; here you have to select a merging option from the available choices, e.g, "Average", "Additive", "Bright, "Dark". You can do so by scrolling down to a merging option and pressing the "SET" button.

Next comes the "No. of exposures" option, since we are doing a double exposure, keep the default 2.

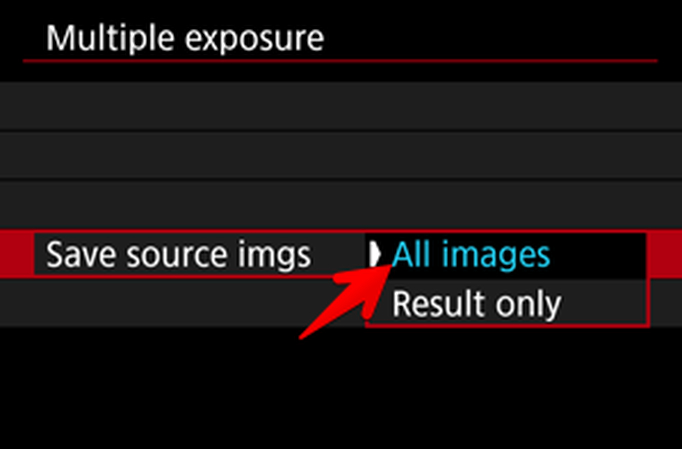
In the "Save Source imgs" option, select "All images" by pressing the "SET" button to save all clicked images instead of saving only the Results (Final double exposure images).

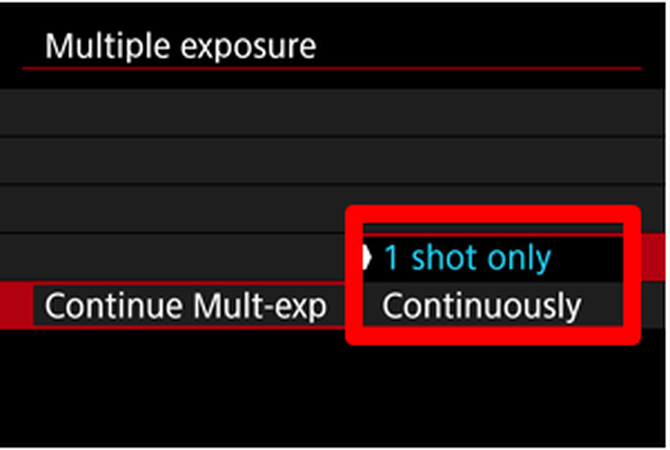
In the "Continue Multi-expo only" option, you have to select between the "1 Shot Only" or "Continuously". "1 Shot Only " means that the "multiple Exposure " mode will end after the shooting ends, and "Continuously" means the double exposure shooting mode will continue unless it is disabled again in the Settings. Go to the option "Continuously" and press the "SET" button to select it.

Step 2. Taking Double Exposure Photos
Before making the double exposure, you have to decide whether you want to use RAW images recorded on the SD card or take fresh photos.
Here comes the last camera setting option, "Select image for multi expo". This option works well when you have already clicked high-contrast base photos or want to use RAW images recorded on the camera's SD card. Go to the option and press the "SET" button to select photos from your SD card.

- To select the required base photo, turn the dial and press "SET". To select "Ok" after choosing the base photo, press the "SET" button again. Once you have selected the base image, its file number will be displayed at the bottom of the screen.
- The next step is to take the second photo. As discussed earlier, the overlay photo normally has patterns and textures, e.g, a floral pattern or branches. While clicking the second photo, keep in mind the photo's contrast concept, so that when the two are blended, they fit well.
Pro Tip: Use the "Live View" mode when capturing the second image. It will show the second image overlaid on the base photo when you try different angles while clicking the overlay photo, and help you choose the right texture or patterns.
Once you have clicked the second photo, your camera will do the rest of the work and create a double exposure photo for you.
Part 5. FAQs of Double Exposure in Photoshop
Q1. Can we use any type of photo as a background photo?
A1. Technically, the answer is no. The base photo must be a high-contrast image with a simple background and a monotone neutral color. It's really important to choose the right base photo so that when it's blended with the overlay photo, it results in a beautiful single photo and not a messy combination.
Q2. Is the double exposure feature available in all cameras?
A2. No, this feature is not available in all digital cameras. You need to check the manual to get information about your digital camera's features, or a simple Google search will also help you figure out if this feature is available in your camera or not.
Conclusion on Double Exposure in Photoshop
In this guide, you've learned about the double exposure in Photoshop.
In 2019, this technique was used by a French-Thai documentary photographer, Aline Deschamps, who visited Matera, an Italian city, to document the city's transformation. She created the double exposure project named Fiore di resilencia, in which she used different photography genres (portraiture, urban landscape, and street photography) and combined them into one by blending the faded architecture with the inhabitant portraits to present the area's beauty.
So, it's not just a technique but holds a unique history and usage. Creating double exposure in Photoshop is the easiest way; however, we have also shared the guidelines and tips for creating double exposure images with a digital camera, so everyone can create them without any problem.









Home > Learn > How to Create Photos with Double Exposure in Photoshop
Select the product rating:
Natalie Carter
Editor-in-Chief
My goal is to make technology feel less intimidating and more empowering. I believe digital creativity should be accessible to everyone, and I'm passionate about turning complex tools into clear, actionable guidance.
View all ArticlesLeave a Comment
Create your review for HitPaw articles