Step 01 The first step involves opening HitPaw Online Background Remover and clicking "Choose File" to browse and open the required image.


People are often unaware of how to change the color of the background in Photoshop. So here is the detailed guide to help you with this issue by explaining the processing through Photoshop and an efficient background remover!
Let's check a step-by-step tutorial on how to change the background color in Photoshop for a portrait image to have a gradient background!
First of all, you need to remove the background of the image by cutting out the subject of your picture instead of selecting the subject. So after selecting and unlocking the image layer, go to the "Windows"> "Properties" to open the "Properties Panel."
Now, click on "Remove Background" from the "Quick Actions" menu. This will automatically create a selection, get over the layer mask, and remove the background.

Even after the background removal, the subject will probably not look perfect. Sometimes small parts of the background color are left behind. However, it is possible to effortlessly give the final touches to the image with the brush tool.
Pick up the "Brush Tool" and adjust the foreground color to black. You have to set the brush size and hardness as required. Next, keep the image layer selected and paint over the areas of the image where you have to make it transparent.
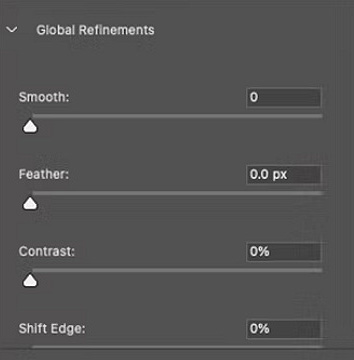
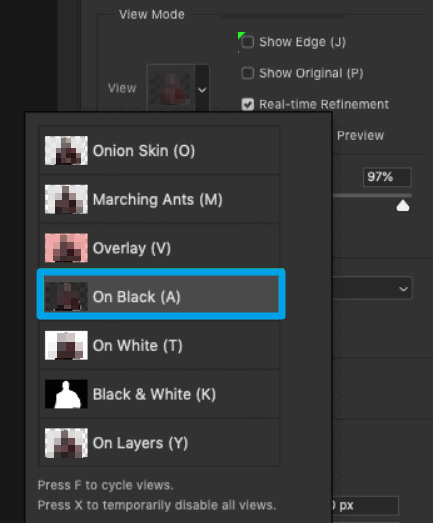
Now, double-click on the layer mask to use the "Select and Mask." But before starting, set the "On Black" option because it's effortless to see the edges against this color. Open the "Global Refinements" window to adjust Smooth, Contrast, and Feather for edge refinement.
What are these sliders for? The smooth slider helps you in the smoothness of the image edges so they don't look jagged. While using the automatic background removal option, this slider is the best choice. The feather slider is to enhance the image's softness. Its primary purpose is to remove the fringing and jagged edges; however, it must be used slightly.
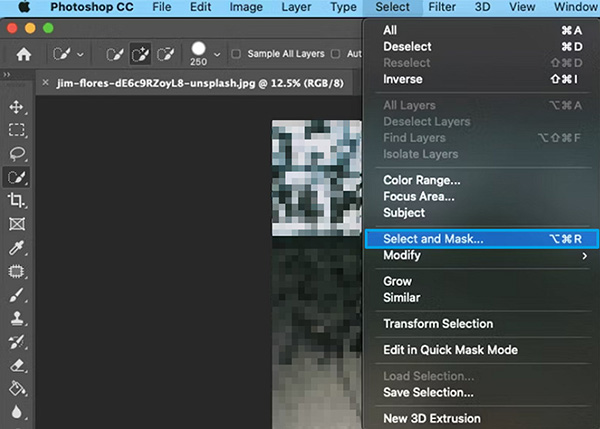
And lastly, the contrast slider is good for altering the sharpness of your image. After using the feather slider, it's a good practice to use a slight contrast to make everything sharp again. However, a shift edge can be used to remove any leftover edges. Move the slider to the left position to shift the edge inward. Click "OK" to confirm changes.
After completely removing the background, what you need to do is to create a color fill layer. However, you can use the gradient layer afterward with the gradient tool. Now, expand the "Layer" tab to select "New Fill Layer" and then "Solid Color."

Select the desired color, rename the layer, and press the "OK" button. The new layer must be kept under the original subject layer.
This step is required if you want to add the gradient background color to your image. So create a new layer over the solid color layer. Now, select this new layer and pick up the "Gradient Tool." Also, choose the transparent gradient as the foreground using the "Gradient Editor."

Choose a color for the transparent gradient, along with the gradient type as circular, inward, outward, etc. Even you can paint on the transparent layer by dragging the color onto this layer and adding the desired intensity by practicing multiple times.
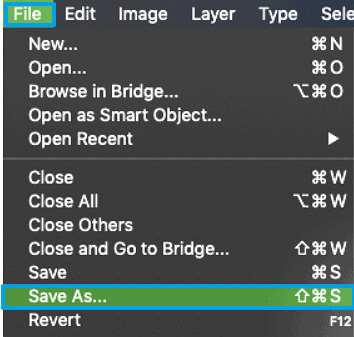
Since you have the gradient background now, you can play more with the other gradient types, colors, and layers according to your requirements. Click "File"> "Save As" to select the output format, rename the file, choose the destination folder, and hit the "Save" button. You are all done!
But what if you need to change the white background of an image to color in Photoshop? Open the "Properties Panel" and click "Select Subject" to make a new selection. After that, create a new color fill layer by clicking "Layer"> "New Fill Layer"> "Solid Color." Pick the desired color, and it will automatically go to the background. Save the file, and that's all!

Whether you want to use a web-based program to avoid the installation headache or save yourself from the complex functioning of Photoshop, HitPaw Online Background Remover proves to be the ultimate solution. It offers a high-quality conversion at the fastest speed. Plus, you can use its other editing features, including adjusting, resizing, and moving the picture.
You can zoom or enlarge the image if required. Moreover, it does not only help you remove the background but also changes the background color. So you can either pick a solid color or an image from the available presets. Last but not least, uploading the image from your system is possible.

Here are some more unique features to consider:
Here is the detailed procedure on how to change background color through HitPaw Online Background Remover!
Step 01 The first step involves opening HitPaw Online Background Remover and clicking "Choose File" to browse and open the required image.

Step 02 You need to press the big "Remove Background" tab at the bottom of the picture. Once the processing gets completed, go for the "Edit" tab to open a new interface.
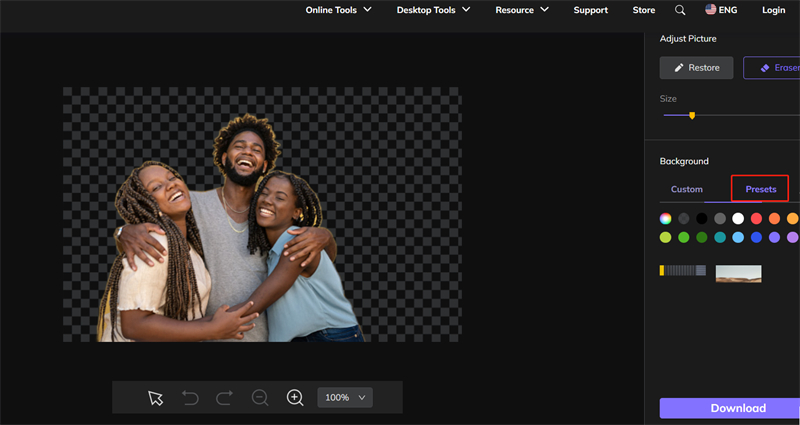
Step 03 Click "Preset" and choose either the solid color or an image for the background. Next, hit the "Download" button to save your image with the new background. All done!

Here is a comparison chart of both Photoshop and HitPaw Online Background Remover in regard to change background color:
| Aspects | HitPaw Background Remover | Photoshop |
|---|---|---|
| Installation | Web-based, requires no installation | Yes, required |
| User Interface | Intuitive | A bit complex |
| Usage | Even non-technical users can go for it | For professionals, so not user-friendly |
| Processing | Almost automatic | Manual |
| Quality | High quality at a quick rate | High quality |
After reading the above guide, you must now be aware of how to change the color of the background in Photoshop. Whether you are working on an image, product photo, or logo, the technique explained here will enable you to get the task done effortlessly.
You can choose the hue saturation option or whatever suits you the best. Photoshop solves almost every image editing issue; however, it requires installation and offers complex processing. In contrast, HitPaw Online Background Remover is the best in being web-based, with quick processing and smooth workflow!
1. How do you make the background black and white in Photoshop?
It is possible to change the background to black by accessing the Discover Panel in Photoshop but try it in its app. Search for it on the upper right of the application interface. Now, browse> Quick Actions to choose the Make B/W background option. Lastly, press the Apply tab that will turn the image background to black & white. That's all!
2. What is the shortcut to changing the background color in Photoshop?
Different shortcut keys change the background color on both Windows and macOS. For Mac, press the Command + Delete button, and for Windows, hit Control + Backspace to fill the background color. However, these shortcut keys work with layers like Shape and Type layers. All done!
3. How do I change the background layer in Photoshop?
You need to use the solid color filler to change the background layer in Photoshop. For this purpose, go to the Layers Panel to press the New Adjustment Layer icon and choose the Solid Color. When the Color Picker window opens up, select the color of your choice and hit the OK button. However, you can change the color later anytime. That's all!
4. How to change the color of your logo in Photoshop?
First, make sure your logo is in PNG format with transparent background. Now, double-click the logo layer to open the dialog box for the layer styles. From the Styles Menu, choose Color Overlay, and pick up a new color for it. Finally, click OK to confirm all the changes and apply them to update the logo color. You are all done!
Recommend Product


HitPaw Watermark Remover
One Click to Remove Video / Image Watermark.


Join the discussion and share your voice here
Leave a Comment
Create your review for HitPaw articles