How to Do Color Grading in Lightroom | 4 Methods
Color grading is essential for photographers and editors looking to elevate their images. Adobe Lightroom offers powerful tools to transform photos by adjusting tones, hues, and overall aesthetics. In this guide, we'll explore what color grading in Lightroom, why Lightroom is a go-to platform for this task, and how to master it using four effective methods. Plus, we'll introduce a great online alternative for color grading.
Part 1: What Is Color Grading in Lightroom?
Color grading involves adjusting and enhancing a photograph's colors, tones, and contrast to create the right mood or atmosphere. This creative technique is widely used in photography and filmmaking to add that professional touch, making it stand out from the ordinary and achieve emotional depth and visual appeal. In Lightroom, color grading calls for multiple adjustments in how highlights, shadows, and mid-tones are altered, giving photographers the comfort of shaping their images according to the vision behind them through effective color grading in Lightroom.
Key Advantages of Color Grading in Lightroom
- Creative Control: Color grading affords you to have complete creative control over the pictures,In other words, you can fashion particular moods and styles specific to your vision.
- Enhanced Mood and Atmosphere: You may adjust the tones and colors, thereby evoking different emotions or moods in the picture,from warmth and nostalgia to coolness and mystery, and hence enhance the overall impact.
- Precise Tuning of Colors: Lightroom provides tools such as the Color Grading Panel andsliders in HSL, with which you can control every color accurately, so even a small detail will be noticed.
- Professional Aesthetic: Colour grading techniques can makeordinary photography look polished, cinematic, and professional if done correctly, suitable for the portfolio or Social Media.
Part 2: Why Choose Lightroom for Color Grading?
These are some reasons why color grading Lightroom is a favorite among photographers and editors:
- User-Friendly Interface: Be an amateur or professional photographer, Lightroom has an easy-to-use layout.
- Precise Tools: Color Grading Panel, HSL sliders, and Tone Curve have minute control over every color element in your picture.
- Seamless Integration: Lightroom seamlessly fits into Adobe's creative ecosystem, allowing you to combineedits with the power of tools like Photoshop.
Color grading has made it simple and accessible as it provides more complex functionalities for in-depth work, as Lightroom offers.
Part 3: How to Do Color Grading in Lightroom (Step-by-Step)
Basic Adjustments Before Color Grading
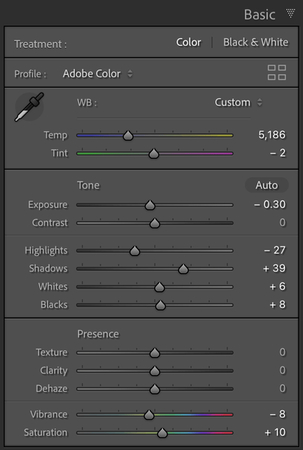
Start by laying the groundwork for your edit with basic adjustments before diving into color grading in Lightroom.
- Balance exposure, contrast, highlights, and shadows in your picture.
- Apply the White Balance Tool. Drag the temperature slider in either direction you desire to warm up the image or cool it off, depending on your desire and
- Perform a final tweaking of clarity and vibrancy to prepare the image for grading.
Method 1: Using the Color Grading Panel
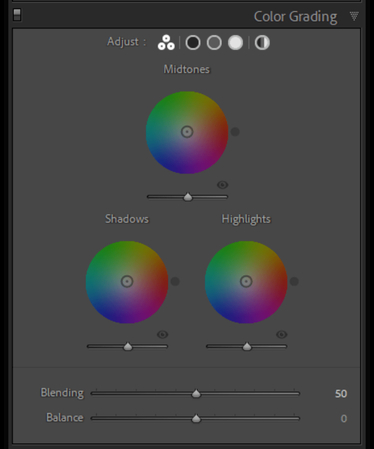
The Color Grading in Lightroom panel is one of the software's most powerful tools for adjusting colors in highlights, midtones, and shadows.
- Step 1:Review your typical editing workflow in the Develop Panel before diving into color grading. This includes adjusting key elements like shadows, highlights, contrast, and white balance.
- Step 2:It's important to note that your edits at this stage won't prevent you from making further adjustments later. These initial edits are a foundation, ensuring your image has good exposure, accurate white balance, and no unintended clipping.
- Step 3:This step is particularly crucial if you're working with a set of images. By ensuring that each image starts from a similar point. You'll be able to achieve a consistent result across the entire set when you move on to color grading.

Method 2: Using HSL (Hue, Saturation, Luminance) Sliders
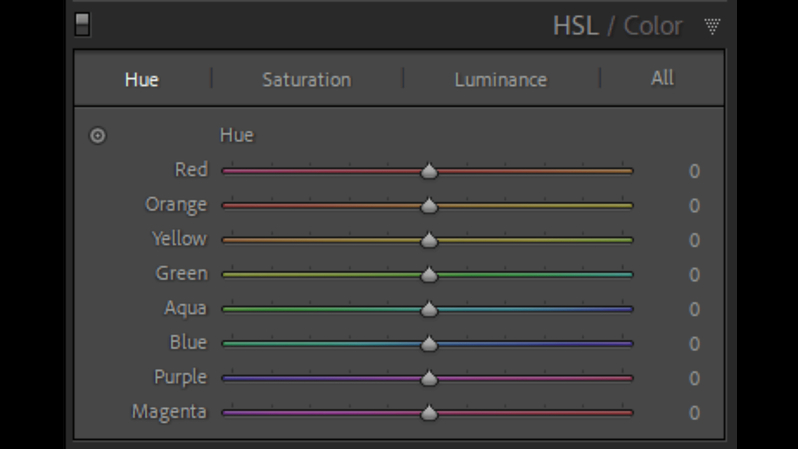
Lightroom color grading using HSL sliders allows targeting specific colors, enabling precise adjustments to your picture. Color-wise enhancements can be produced, giving your photos a vibrant and customized look.
Step 1: Understand the Basics of HSL
HSL stands for Hue, Saturation, and Luminance.

- Huerefers to "What color?"
- Saturationindicates "How much color?"
- Luminancecontrols "How bright or dark is the color?"
Step 2: Access the HSL Panel
In the HSL panel, you can adjust the hue, saturation, and luminance of different colors: Red, Orange, Yellow, Green, Aqua, Blue, Purple, and Magenta. These sliders give you precise control over the colors present in your photo. Remember that HSL allows you to modify existing colors but not add new ones. For example, if there's no red in the image, you can't add red using these sliders.

Step 3: Use the Hue Tab for Color Shifts
The Hue tab lets you adjust the base colors of the image. Each slider in the Hue tab has two colors at either end. Moving the slider toward one end shifts the color toward that hue.

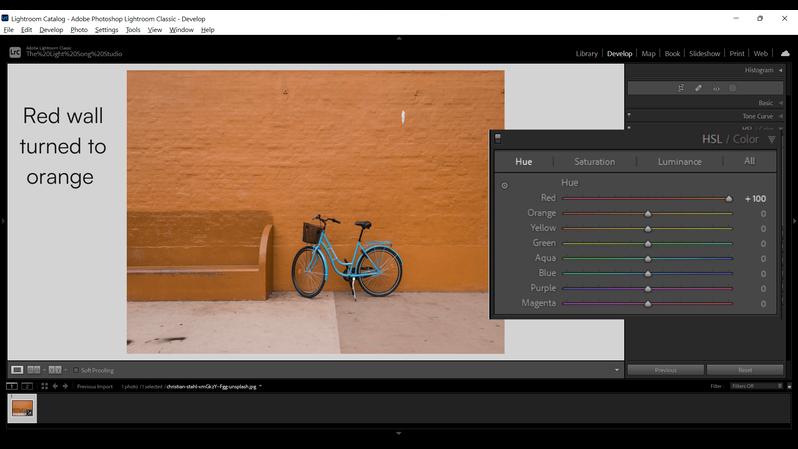
- For instance, moving the Red hue sliderto +100 will shift reds toward orange.
- Similarly, moving the Green hue sliderto -100 will turn greens into yellows.
If you want to transform reds into yellows, first shift the Red hue slider to +100 (turning reds to orange), then move the Orange slider to +100 (transforming the orange to yellow).
Step 4: Control the Intensity with Saturation Sliders
The Saturation sliders control the intensity of each color.

- A -100 valuewill desaturate the color, turning it into grayscale.
- A +100 valuewill intensify the color, making it appear more vivid and pronounced in your image.
Step 5: Adjust Brightness with Luminance Sliders
The Luminance sliders control the brightness of the selected colors. This adjustment is similar to adding tints (by adding white) or shades (by adding black) to a color.
- Increasing the luminance will make the color appear brighter while decreasing it will make it darker.
Method 3: Utilizing Curves for Advanced Grading
Curves are an advanced color grading approach in Lightroom that allows users to control brightness, contrast, and RGB channels.
Step 1:Open Tone Curve in the Develop Module.

Step 2:Adjust the curve to control overall brightness and contrast.
Step 3:Switch to the Red, Green, or Blue Channel to create precise color shifts (e.g., adding warm red tones to shadows)

Step 4:Experiment with subtle adjustments for cinematic looks or dramatic contrasts.

Curves are perfect for editors who want to experiment and explore new creative horizons with minute control over color and tone.
Method 4: Applying Lightroom Presets for Instant Results
Color grading in Lightroom with presets can easily produce professional-level results without much effort.
Step 1:Browse through Lightroom's preset library or import third-party custom presets.

Step 2:Apply the chosen preset to your photo.
Step 3:Tweak the preloaded by exposing, saturating, and nudging sliders to tweak to your liking on the photo.

Presets are great for saving time without compromising consistency for a set of photos and are, hence, favorites in wedding or travel photography.
Part 4: [Bonus Tip] Best Lightroom Alternative Online for Color Grading
If you need a faster and more efficient alternative to color grading in Lightroom, you should check HitPaw Online Photo Enhancer. This browser-based tool makes photo enhancement more accessible with the power of AI technology, working well for people from all levels. Whether it's quality improvement or creative freedom, HitPaw can provide hassle-free access to users who do not require high skills or software installations.
Key Features of HitPaw Online AI Photo Enhancer
- AI-Powered Technology: Automatically detects and enhances photo details to improve colors, sharpness, and overall quality in just one click.
- Browser-Based Convenience: It works entirely on the browser, so there is no need to download or installsoftware, thereby saving precious time and storage space.
- Professional Results Instantly: It provides enhancementsof professional quality, so it's perfect for the portfolio and social media posts.
- User-Friendly Interface: Intuitive interface, with many users looking for simplicity and getting great results quickly.
- Supports Multiple Formats: It is compatiblewith various image formats, ensuring flexibility and access to different types of photos.
Steps to Use HitPaw Online AI Photo Enhancer
Step 1: Upload Image or Drag and Drop
Navigate to the AI HitPaw Online Photo Enhancer. To upload, click "Choose Image" and select your file or drag your image into the drop zone.

Step 2: Wait a Moment
After uploading, the AI tool will begin processing the photo. Depending on the size and complexity of the image, this may take a few seconds.

Step 3: Check the Quality Before and After
Once the enhancement is complete, compare the original and improved image versions. Switch between them to view the adjustments, such as better detail and color enhancement.

Step 4: Download Image
If you're happy with the result, click "Download" to save the enhanced image to your device. Your photo is now ready for use!

Part 5: FAQs about Color Grading in Lightroom
Q1. What is the difference between color grading and color correction in Lightroom?
A1. Color grading in Lightroom enhances your images by improving the mood or character through creative adjustments. In contrast, color correction ensures accurate colors by fixing issues like incorrect white balance or exposure settings.
Q2. Can beginners achieve professional results with Lightroom's Color Grading Panel?
A2. Absolutely! The Lightroom's color grading panel is straightforward and provides controls that help novices experiment and achieve incredible results.
Q3. What are the best presets for cinematic color grading in Lightroom?
A3. Some popular presets include the Moody Cinematic Preset, Teal and Orange Preset, and Vintage Film Preset. These can be downloaded online or purchased from trusted creators.
Conclusion
Color grading in Lightroom is a transformative process that can take your photos from ordinary to extraordinary. The interface is intuitive and includes features like the Color Grading Panel, HSL sliders, and Tone Curve, so it is the ultimate tool for color grading. The above methods will be helpful in mastering color grading, whether you are a beginner or a pro. HitPaw Online AI Photo Enhancer provides a quick and efficient way to make stunning edits without complex software for those looking for an online alternative. Enhance your photos effortlessly and take your creativity to the next level!
Try It Now!


Home > Learn > How to Do Color Grading in Lightroom | 4 Methods
Select the product rating:
Daniel Walker
Editor-in-Chief
My passion lies in bridging the gap between cutting-edge technology and everyday creativity. With years of hands-on experience, I create content that not only informs but inspires our audience to embrace digital tools confidently.
View all ArticlesLeave a Comment
Create your review for HitPaw articles