What Is Color Correction and How to Use It in Photoshop
Color correction is one photo editing technique that even gives professional photo editors sleepless nights. Correcting the color of a photo can take a lot of effort, and still, it isn't guaranteed that you'll meet the required results of the photo.
Photoshop is one of the best ways to edit photos; it helps you know how to color-correct photos. Apart from discussing the color correction service of Photoshop, we'll tell you "what is color correction" and what we should know about it.
Part 1: What Is A Color Correction
The color correction definition is pretty simple, and there is no rocket science behind it. When you take a picture on your mobile camera, it is impossible to take the picture ideally.
Thus, restoring an image's original position is called a color correction. Sometimes, when we click photos, the control over lighting needs to catch up, which could end up making our photos faulty and irrelevant.
Color correction helps to balance the color of your photos, and that includes your skin color or the color of other objects appearing in the photos.
Wherever the talk of color correction goes, it is almost impossible to ignore the color grading in this aspect. Both attributes perform almost the same functions but have significant differences.
Color correction
Color correction is the way of making your photo original and restoring the original state of photos by correcting its colors.
We might struggle to film the original color of a person or object, and that's where the color correction term comes into play, helping us restore the original shape of a photo.
Color grading
On the other hand, color grading deals with something other than restoring the original state of a photo. Instead, color relies upon appearances.
With color grading, you can change the originality of a photo by adding new colors only to make it look attractive and eye-catching. Color grading doesn't make a picture original but might help enhance the quality or beauty of a picture.
Part 2: How to Fix Color from Images in Photoshop
After knowing ''what is color correction'', let us discuss Photoshop color correction. Photoshop is one of the oldest and most effective photo editing tools that has been a significant helper for those looking to perform different editing operations on photos.
So, if you intend to correct the color of the photos, Photoshop comes up with an auto color correction feature. With the automatic feature, you don't have to do much to correct the colors of your photo.
Instead, all you need to do is gather the basic knowledge of Photoshop, and you'll be okay with it. Photoshop offers auto commands: Auto tone, color, and contrast. With all these functions, generating sparkling images won't be an issue. Usually, Adobe Photoshop tends to mix the three primary colors, including blue, green, and red, using color channels.
You can see all the primary color's color channels in the ''Channel'' menu.
Here's the step-by-step guide to how Photoshop color correction works.
-
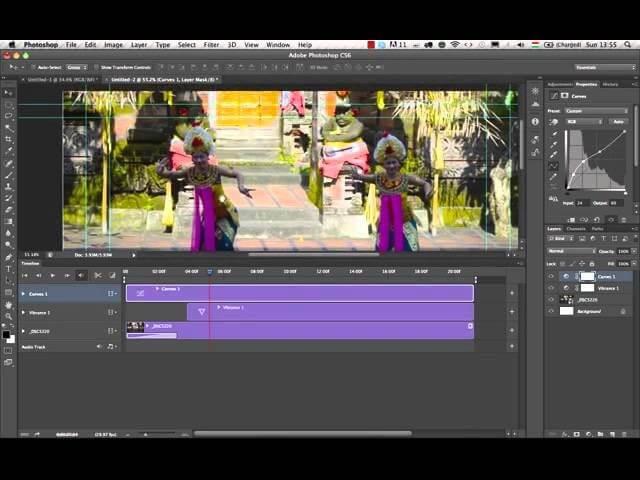
1.Visit the main website of Adobe Photoshop and install the image editor from there. After installing the software, you'll need to start it and select the photo you'd like to correct the colors of. Next, import the photo to the main interface of Photoshop and drag it to the timeline.

-
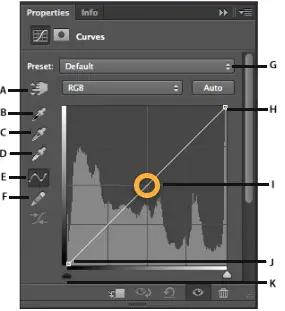
2.After navigating to the right side of the interface, tap on the Adjustment layer. Proceed ahead by hitting the ''Curves'' icon from the displayed menu.

-
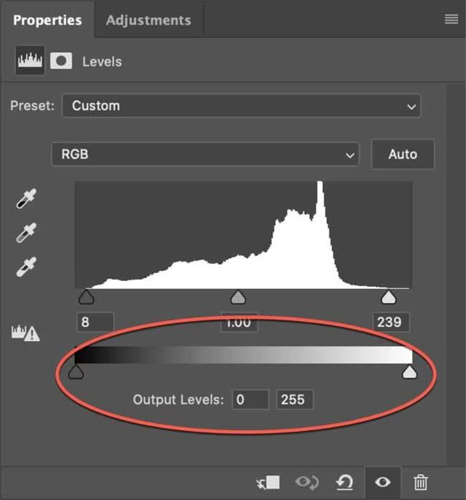
3.Now, you'll be able to see the histogram near the image. Tap on the Auto icon in the histogram's right corner. Doing so helps you see the customizable functionalities. Next, click on the ' save as default'' icon after selecting the preferred settings.

-
4.Regulate the color, contrast, and tone levels via a pointer. You can also move your pointer backward or forward to reduce or increase your adjustment levels. After applying all these settings, you've got the luxury of previewing all the settings you've done. Previewing the photo before saving it can help save a lot of your time and effort, as otherwise, you've had to begin from scratch in case you find flaws in your photo after downloading it.

-
5.Lastly, click the ''Save'' icon to apply all the editing techniques you've performed. This way, you can export the edited photo to your desired place, and that's all you have to opt for the color correction Photoshop.
Extra Tip: How to Colorize Photos with AI on HitPaw
We are all for using Photoshop as a color correction service, but if you don't know how to use Photoshop, you will struggle to edit photos on Photoshop.
Hence, looking for HitPaw FotorPea will not help you correct the colors of photos automatically but will also ensure you don't have any problems using this software.
Since HitPaw FotorPea comes up with the auto color correction feature, you must import the photo you'd like to colorize and let the tool do the rest.
Apart from colorizing black and white photos or restoring the original shape of a photo, HitPaw FotorPea takes care of all other photo editing techniques.
Features of HitPaw FotorPea:
- Allows you to colorize photos automatically
- Comes up with 4 AI models
- Fix the black-and-white photos
- Supports batch enhancing
- Comes up with a simple user interface
- Excellent custom support
- Allows you to apply realistic and natural colors to your old photos
- Supports multiple images formats, including JFIF, BMP, WEBP, JPG, PNG, etc
How to do photo color correction via HitPaw FotorPea?
-
1.To start with, navigate to the official website of HitPaw FotorPea and get the latest version of software installed on your PC.
-
2.After installing it, you'll need to launch it and start the proceedings. Next, tap on the '' Choose Files'' icon and upload the photo you'd like to correct the color of. Remember, you can import multiple photos as HitPaw Photo supports the batch enhancement of your photos.

-
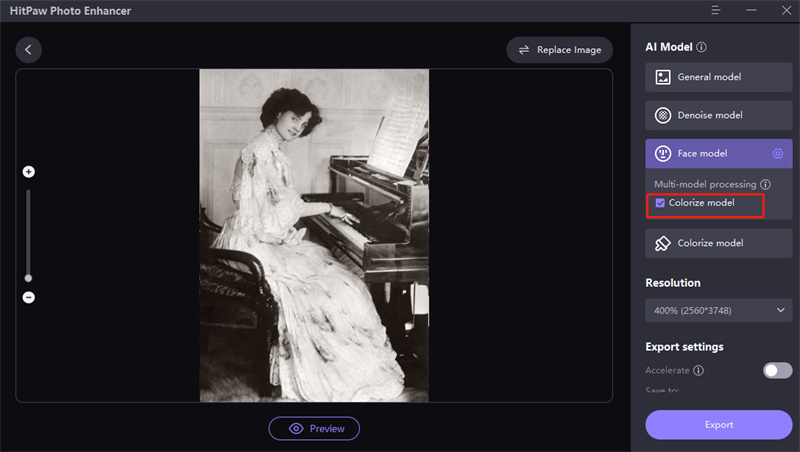
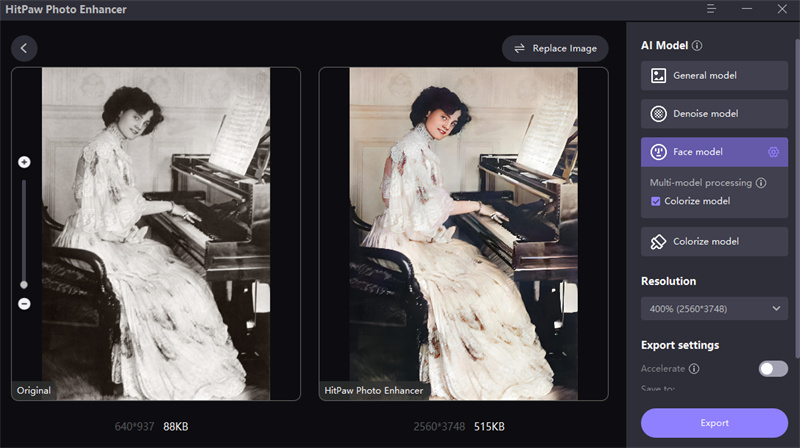
3.Select the ''Colorize Model'' from the four AI models you'll find on the left side of your screen. Next, Preview the photo, and if you're satisfied with the colorization of the photo, you can go ahead with it. If you feel a slight improvement, follow the above mentioned steps to colorize the photo again.

-
4.After doing the color correction, click on the Export icon to get the edited photo downloaded to your computer.

Conclusion
This piece of writing will help you understand photo color correction better than ever. If you've had any doubts regarding the difference between color correction vs. color grading, we were also keen to diminish those doubts.
The end assessment we've got about whether you should use HitPaw FotorPea or Photoshop for color correction service is that HitPaw FotorPea is currently better than Photoshop on many fronts.
Apart from being a user-friendly AI-powered software, HitPaw FotorPea also doesn't affect the resolution of photos.










Home > Learn > What Is Color Correction and How to Use It in Photoshop
Select the product rating:
Natalie Carter
Editor-in-Chief
My goal is to make technology feel less intimidating and more empowering. I believe digital creativity should be accessible to everyone, and I'm passionate about turning complex tools into clear, actionable guidance.
View all ArticlesLeave a Comment
Create your review for HitPaw articles